<?xml version="1.0" encoding="utf-8"?><feed xmlns="http://www.w3.org/2005/Atom" ><generator uri="https://jekyllrb.com/" version="3.10.0">Jekyll</generator><link href="https://bendirt.com/feed.xml" rel="self" type="application/atom+xml" /><link href="https://bendirt.com/" rel="alternate" type="text/html" /><updated>2026-03-21T19:40:52+00:00</updated><id>https://bendirt.com/feed.xml</id><title type="html">Ben Purinton</title><subtitle>Made with jekyll and mimimal mistakes.</subtitle><author><name>Ben Purinton</name></author><entry><title type="html">asp-plot: Automated Diagnostic Reports for Satellite Stereo DEMs</title><link href="https://bendirt.com/asp-plot-visualizing-stereo-dems/" rel="alternate" type="text/html" title="asp-plot: Automated Diagnostic Reports for Satellite Stereo DEMs" /><published>2026-03-21T00:00:00+00:00</published><updated>2026-03-21T00:00:00+00:00</updated><id>https://bendirt.com/asp-plot-visualizing-stereo-dems</id><content type="html" xml:base="https://bendirt.com/asp-plot-visualizing-stereo-dems/"><![CDATA[<p>If you’ve ever processed satellite stereo imagery to generate a Digital Elevation Model (DEM), you know the drill: you wait for the processing to finish, then you open up the results in QGIS or some other GIS tool, squint at the hillshade, flip between a dozen intermediate files, and try to figure out if your DEM is any good. It’s tedious, it’s manual, and it’s easy to miss problems.</p>

<p>I got tired of this workflow, so I built <a href="https://github.com/uw-cryo/asp_plot" target="_blank">asp-plot</a> — a Python package that automatically generates diagnostic visualizations and comprehensive PDF reports from <a href="https://stereopipeline.readthedocs.io/" target="_blank">NASA Ames Stereo Pipeline (ASP)</a> output. One command, and you get a full quality assessment of your stereo DEM processing results.</p>

<h2 id="the-problem">The problem</h2>

<p>ASP is an incredible open-source tool for generating DEMs from satellite stereo imagery. It supports everything from WorldView and ASTER on Earth to HiRISE on Mars and LROC NAC on the Moon. But ASP’s output is a collection of rasters and log files — it doesn’t give you a nice visual summary of what happened during processing.</p>

<p>When you’re running dozens or hundreds of stereo pairs (as we often do in our <a href="https://github.com/uw-cryo" target="_blank">UW cryosphere group</a>), you need a fast way to triage results. Which pairs had good bundle adjustment? Where did the stereo correlation struggle? How does the DEM compare to independent elevation data? Answering these questions manually for each pair doesn’t scale.</p>

<h2 id="what-asp-plot-does">What asp-plot does</h2>

<p>The package reads ASP processing directories and generates a multi-page PDF report covering every step of the pipeline:</p>

<ul>
  <li><strong>Input scenes</strong> — the left and right stereo images</li>
  <li><strong>Stereo geometry</strong> — skyplot and map view of satellite acquisition angles, convergence angle, and other quality metrics</li>
  <li><strong>Match points</strong> — interest points identified between images during correlation</li>
  <li><strong>Bundle adjustment residuals</strong> — before and after maps showing how well the camera models were refined</li>
  <li><strong>Detailed hillshade</strong> — the DEM rendered as a hillshade with zoomed insets at low, medium, and high uncertainty areas, plus corresponding ortho imagery</li>
  <li><strong>DEM results</strong> — the stereo DEM, triangulation intersection error, and difference relative to a reference DEM</li>
  <li><strong>Disparity maps</strong> — pixel offsets with quiver overlays</li>
  <li><strong>ICESat-2 validation</strong> — comparison against NASA’s ICESat-2 laser altimetry data, with per-landcover statistics and along-track elevation profiles</li>
  <li><strong>Processing parameters</strong> — a record of the exact commands used, for reproducibility</li>
</ul>

<p><img style="border: 2px solid black" src="/assets/images/asp-plot-hillshade.png" alt="asp-plot detailed hillshade output" width="700" /></p>
<p align="left">
<i>Example detailed hillshade page from an asp-plot report, showing elevation-colored hillshade with zoomed insets at varying uncertainty levels.</i>
</p>

<p>That hillshade page is one of my favorites. It automatically picks three subsets from areas of low, medium, and high intersection error, so you can immediately see where the stereo correlation worked well and where it struggled. The corresponding ortho image subsets below let you understand <em>why</em> — maybe there’s a water body, or dense vegetation, or some other surface that’s tough to correlate.</p>

<h3 id="the-icesat-2-comparison">The ICESat-2 comparison</h3>

<p>The package queries NASA’s <a href="https://slideruleearth.io/" target="_blank">SlideRule</a> service for ICESat-2 ATL06-SR data overlapping the DEM footprint, computes elevation differences, and breaks down the statistics by land cover type.</p>

<p><img style="border: 2px solid black" src="/assets/images/asp-plot-icesat2.png" alt="asp-plot ICESat-2 validation" width="700" /></p>
<p align="left">
<i>ICESat-2 ATL06-SR elevation compared against the stereo DEM.</i>
</p>

<p>This is useful for understanding DEM accuracy without needing ground control points. You can see right away if there’s a systematic vertical bias, and whether accuracy varies across different land cover types (spoiler: tree cover is often the worst).</p>

<h3 id="example-report">Example report</h3>

<p>Here’s a full example report generated from a WorldView stereo pair over Hartsfield-Jackson Atlanta International Airport. The airport is a great test case — it has flat runways (easy for stereo), tall buildings (challenging for stereo), and plenty of ICESat-2 overpasses for validation.</p>

<div style="width: 100%; height: 1000px; margin: 20px 0; border: 1px solid #e9ecef; border-radius: 8px; overflow: hidden; box-shadow: 0 2px 10px rgba(0,0,0,0.05);">
    <iframe src="/assets/documents/WorldView_Atlanta-asp-plot-report.pdf" style="width: 100%; height: 100%; border: none;" title="asp-plot example report"></iframe>
</div>
<p align="left">
<i>Full 13-page asp-plot report for a WorldView stereo pair over Atlanta. <a href="/assets/documents/WorldView_Atlanta-asp-plot-report.pdf" target="_blank">Open in new tab</a>.</i>
</p>

<h3 id="usage">Usage</h3>

<p>Getting started is straightforward. Install from conda-forge or PyPI:</p>

<div class="language-bash highlighter-rouge"><div class="highlight"><pre class="highlight"><code>conda <span class="nb">install</span> <span class="nt">-c</span> conda-forge asp-plot
</code></pre></div></div>

<p>Then point it at your ASP processing directory:</p>

<div class="language-bash highlighter-rouge"><div class="highlight"><pre class="highlight"><code>asp_plot <span class="nt">--directory</span> /path/to/stereo_run/ <span class="se">\</span>
         <span class="nt">--bundle_adjust_directory</span> ba/ <span class="se">\</span>
         <span class="nt">--stereo_directory</span> stereo/ <span class="se">\</span>
         <span class="nt">--map_crs</span> EPSG:32616 <span class="se">\</span>
         <span class="nt">--report_filename</span> my-report.pdf <span class="se">\</span>
         <span class="nt">--report_title</span> <span class="s2">"My Stereo Pair"</span>
</code></pre></div></div>

<p>That’s it. A few minutes later you have a comprehensive PDF report. The package also exposes a Python API if you want to generate individual plots or customize the analysis — check out the <a href="https://asp-plot.readthedocs.io/en/latest/examples/index.html" target="_blank">notebook tutorials</a> for more details.</p>

<h2 id="multi-sensor-support">Multi-sensor support</h2>

<p>One thing that makes asp-plot flexible is its support for different satellite sensors and even planetary data. The same reporting framework works for:</p>

<ul>
  <li><strong>Earth</strong>: WorldView, GeoEye, ASTER</li>
  <li><strong>Moon</strong>: Lunar Reconnaissance Orbiter NAC</li>
  <li><strong>Mars</strong>: MRO CTX, MRO HiRISE, MGS MOC</li>
</ul>

<p>The sensor-specific notebooks in the <a href="https://asp-plot.readthedocs.io/en/latest/examples/index.html" target="_blank">documentation</a> show examples for each. For Moon and Mars, the ICESat-2 altimetry comparisons (Earth only) are replaced by <a href="https://science.nasa.gov/mission/lro/lola/">LOLA</a> and <a href="https://science.gsfc.nasa.gov/attic/mola/">MOLA</a>, respectively.</p>

<h2 id="whats-next">What’s next</h2>

<p>I’m continuing to develop asp-plot as part of my work with the UW cryosphere group. So expect frequent updates and potential breaking changes!</p>

<p>If you work with ASP and want to try it out, the package is fully open source: <a href="https://github.com/uw-cryo/asp_plot" target="_blank">GitHub</a> | <a href="https://asp-plot.readthedocs.io/" target="_blank">Documentation</a> | <a href="https://anaconda.org/channels/conda-forge/packages/asp-plot/overview" target="_blank">conda-forge</a>. Issues and PRs are welcome!</p>]]></content><author><name>Ben Purinton</name></author><category term="python" /><category term="dem" /><category term="stereo" /><category term="asp" /><category term="remote-sensing" /><category term="open-source" /><summary type="html"><![CDATA[asp-plot, a Python package for visualizing and quality-checking stereo DEM results from NASA's Ames Stereo Pipeline]]></summary></entry><entry><title type="html">Building an Interactive CV Builder with Claude</title><link href="https://bendirt.com/building-cv-builder-with-claude/" rel="alternate" type="text/html" title="Building an Interactive CV Builder with Claude" /><published>2025-07-20T00:00:00+00:00</published><updated>2025-07-20T00:00:00+00:00</updated><id>https://bendirt.com/building-cv-builder-with-claude</id><content type="html" xml:base="https://bendirt.com/building-cv-builder-with-claude/"><![CDATA[<p>As someone who straddles the worlds of academic research and tech education, I’ve always struggled with maintaining different versions of my CV. I have a comprehensive academic CV in LaTeX that spans multiple pages, and a condensed one-page version for industry roles. But updating both is tedious, and neither really captures my unique career trajectory.</p>

<p>So I decided to build something better: an interactive, web-based CV builder that I could customize on the fly and publish directly to my Jekyll site. Here’s how I did it with the help of Claude.</p>

<p>(It’s linked below at the end of the post, but if you’re anxious to have a look now: <a href="/cv-builder" target="_blank">CV Builder</a>)</p>

<h1 id="the-journey-begins-claude-artifacts">The Journey Begins: Claude Artifacts</h1>

<p>I started with Claude’s web-based Artifacts tool, which lets you iterate on code in a visual interface. My initial prompt was simple:</p>

<blockquote>
  <p>I want a slick CV template. I’m a scientist with a bunch of education and research credentials, but I now work for an education startup that teaches people to code. I’m the head of operations there.</p>
</blockquote>

<p>Claude generated a beautiful, interactive CV template with:</p>
<ul>
  <li>Editable fields (using <code class="language-plaintext highlighter-rouge">contenteditable</code>)</li>
  <li>A professional gradient header</li>
  <li>Organized sections for experience, skills, education, etc.</li>
  <li>Print-friendly CSS</li>
  <li>Dynamic add/remove functionality for list items</li>
</ul>

<p>After some iteration in the Artifacts interface to refine the design and functionality, I had a solid foundation. But I wanted to integrate this into my Jekyll site and add some crucial features.</p>

<h1 id="moving-to-the-repository">Moving to the Repository</h1>

<p>I brought the code over to my GitHub Pages repository and continued working with Claude in my local development environment. This is where things got interesting.</p>

<h2 id="the-localstorage-dilemma">The localStorage Dilemma</h2>

<p>My first challenge: the CV builder would reset to the template every time I visited the page. Annoying! My initial thought was to use localStorage to persist edits between sessions.</p>

<div class="language-javascript highlighter-rouge"><div class="highlight"><pre class="highlight"><code><span class="kd">function</span> <span class="nx">saveToLocalStorage</span><span class="p">()</span> <span class="p">{</span>
    <span class="kd">const</span> <span class="nx">cvContent</span> <span class="o">=</span> <span class="nb">document</span><span class="p">.</span><span class="nx">querySelector</span><span class="p">(</span><span class="dl">'</span><span class="s1">.main-content</span><span class="dl">'</span><span class="p">).</span><span class="nx">innerHTML</span><span class="p">;</span>
    <span class="nx">localStorage</span><span class="p">.</span><span class="nx">setItem</span><span class="p">(</span><span class="dl">'</span><span class="s1">cvBuilderContent</span><span class="dl">'</span><span class="p">,</span> <span class="nx">cvContent</span><span class="p">);</span>
    <span class="nx">localStorage</span><span class="p">.</span><span class="nx">setItem</span><span class="p">(</span><span class="dl">'</span><span class="s1">cvBuilderLastSaved</span><span class="dl">'</span><span class="p">,</span> <span class="k">new</span> <span class="nb">Date</span><span class="p">().</span><span class="nx">toISOString</span><span class="p">());</span>
<span class="p">}</span>
</code></pre></div></div>

<p>But then I realized the fundamental issue: localStorage is browser-specific. Other visitors to my site wouldn’t see my actual CV—they’d see the blank template!</p>

<h2 id="the-static-html-solution">The Static HTML Solution</h2>

<p>After discussing options with Claude, we landed on a clever solution:</p>

<ol>
  <li><strong>Edit locally</strong>: Use the CV builder at <code class="language-plaintext highlighter-rouge">/cv-builder</code> to create and edit my CV</li>
  <li><strong>Publish to static</strong>: Export the completed CV as a static HTML file</li>
  <li><strong>Commit to repo</strong>: Save this as <code class="language-plaintext highlighter-rouge">cv-current.html</code> in my repository</li>
  <li><strong>Display publicly</strong>: Embed the static CV on my main <code class="language-plaintext highlighter-rouge">/cv</code> page</li>
</ol>

<p>Here’s the publish function that makes the magic happen:</p>

<div class="language-javascript highlighter-rouge"><div class="highlight"><pre class="highlight"><code><span class="kd">function</span> <span class="nx">publishCV</span><span class="p">()</span> <span class="p">{</span>
    <span class="c1">// Clone the current CV</span>
    <span class="kd">const</span> <span class="nx">cvClone</span> <span class="o">=</span> <span class="nb">document</span><span class="p">.</span><span class="nx">querySelector</span><span class="p">(</span><span class="dl">'</span><span class="s1">.cv-container</span><span class="dl">'</span><span class="p">).</span><span class="nx">cloneNode</span><span class="p">(</span><span class="kc">true</span><span class="p">);</span>
    
    <span class="c1">// Remove all edit controls and buttons</span>
    <span class="nx">cvClone</span><span class="p">.</span><span class="nx">querySelectorAll</span><span class="p">(</span><span class="dl">'</span><span class="s1">.print-controls, .section-controls, .item-controls</span><span class="dl">'</span><span class="p">)</span>
        <span class="p">.</span><span class="nx">forEach</span><span class="p">(</span><span class="nx">el</span> <span class="o">=&gt;</span> <span class="nx">el</span><span class="p">.</span><span class="nx">remove</span><span class="p">());</span>
    
    <span class="c1">// Remove contenteditable attributes</span>
    <span class="nx">cvClone</span><span class="p">.</span><span class="nx">querySelectorAll</span><span class="p">(</span><span class="dl">'</span><span class="s1">[contenteditable]</span><span class="dl">'</span><span class="p">)</span>
        <span class="p">.</span><span class="nx">forEach</span><span class="p">(</span><span class="nx">el</span> <span class="o">=&gt;</span> <span class="nx">el</span><span class="p">.</span><span class="nx">removeAttribute</span><span class="p">(</span><span class="dl">'</span><span class="s1">contenteditable</span><span class="dl">'</span><span class="p">));</span>
    
    <span class="c1">// Create the full HTML document</span>
    <span class="kd">const</span> <span class="nx">htmlContent</span> <span class="o">=</span> <span class="s2">`&lt;!DOCTYPE html&gt;
&lt;html lang="en"&gt;
&lt;head&gt;
    &lt;meta charset="UTF-8"&gt;
    &lt;title&gt;</span><span class="p">${</span><span class="nb">document</span><span class="p">.</span><span class="nx">querySelector</span><span class="p">(</span><span class="dl">'</span><span class="s1">.name</span><span class="dl">'</span><span class="p">).</span><span class="nx">textContent</span><span class="p">}</span><span class="s2"> - CV&lt;/title&gt;
    &lt;style&gt;</span><span class="p">${</span><span class="nb">document</span><span class="p">.</span><span class="nx">querySelector</span><span class="p">(</span><span class="dl">'</span><span class="s1">style</span><span class="dl">'</span><span class="p">).</span><span class="nx">textContent</span><span class="p">}</span><span class="s2">&lt;/style&gt;
&lt;/head&gt;
&lt;body&gt;
    </span><span class="p">${</span><span class="nx">cvClone</span><span class="p">.</span><span class="nx">outerHTML</span><span class="p">}</span><span class="s2">
&lt;/body&gt;
&lt;/html&gt;`</span><span class="p">;</span>
    
    <span class="c1">// Trigger download</span>
    <span class="kd">const</span> <span class="nx">blob</span> <span class="o">=</span> <span class="k">new</span> <span class="nx">Blob</span><span class="p">([</span><span class="nx">htmlContent</span><span class="p">],</span> <span class="p">{</span> <span class="na">type</span><span class="p">:</span> <span class="dl">'</span><span class="s1">text/html</span><span class="dl">'</span> <span class="p">});</span>
    <span class="kd">const</span> <span class="nx">url</span> <span class="o">=</span> <span class="nx">URL</span><span class="p">.</span><span class="nx">createObjectURL</span><span class="p">(</span><span class="nx">blob</span><span class="p">);</span>
    <span class="kd">const</span> <span class="nx">a</span> <span class="o">=</span> <span class="nb">document</span><span class="p">.</span><span class="nx">createElement</span><span class="p">(</span><span class="dl">'</span><span class="s1">a</span><span class="dl">'</span><span class="p">);</span>
    <span class="nx">a</span><span class="p">.</span><span class="nx">href</span> <span class="o">=</span> <span class="nx">url</span><span class="p">;</span>
    <span class="nx">a</span><span class="p">.</span><span class="nx">download</span> <span class="o">=</span> <span class="dl">'</span><span class="s1">cv-current.html</span><span class="dl">'</span><span class="p">;</span>
    <span class="nx">a</span><span class="p">.</span><span class="nx">click</span><span class="p">();</span>
<span class="p">}</span>
</code></pre></div></div>

<h2 id="the-template-literal-trap">The Template Literal Trap</h2>

<p>One interesting bug we encountered: when generating the static HTML, I initially had a <code class="language-plaintext highlighter-rouge">&lt;script&gt;</code> tag inside a template literal, which confused the browser’s parser. The solution? Break it up:</p>

<div class="language-javascript highlighter-rouge"><div class="highlight"><pre class="highlight"><code><span class="c1">// Instead of &lt;script&gt;, use:</span>
<span class="o">&lt;</span><span class="nx">$</span><span class="p">{</span><span class="dl">'</span><span class="s1">script</span><span class="dl">'</span><span class="p">}</span><span class="o">&gt;</span>
    <span class="kd">function</span> <span class="nx">printCV</span><span class="p">()</span> <span class="p">{</span> <span class="nb">window</span><span class="p">.</span><span class="nx">print</span><span class="p">();</span> <span class="p">}</span>
<span class="o">&lt;</span><span class="sr">/${'script'}</span><span class="err">&gt;
</span></code></pre></div></div>

<h1 id="the-final-product">The Final Product</h1>

<p>The result is a three-part system:</p>

<ol>
  <li><strong>CV Builder</strong> (<code class="language-plaintext highlighter-rouge">/cv-builder</code>): An interactive editor where I can update my CV</li>
  <li><strong>Static CV</strong> (<code class="language-plaintext highlighter-rouge">/cv-current</code>): The published, read-only version for visitors. I can print this page to save it as PDF for distribution.</li>
  <li><strong>CV Page</strong> (<code class="language-plaintext highlighter-rouge">/cv</code>): Displays the static CV in an iframe with links to the builder and PDF versions</li>
</ol>

<h2 id="key-features">Key Features</h2>

<ul>
  <li><strong>Fully editable</strong>: Click any text to edit it in place</li>
  <li><strong>Dynamic sections</strong>: Add/remove experience items, skills, publications, etc.</li>
  <li><strong>Print-friendly</strong>: Optimized CSS for clean PDF generation</li>
  <li><strong>Mobile responsive</strong>: Works great on all devices</li>
  <li><strong>Version controlled</strong>: The published CV is committed to Git</li>
  <li><strong>No database needed</strong>: Perfect for static sites like Jekyll</li>
</ul>

<h2 id="next-up-features">Next Up Features</h2>

<p>The interactive CV builder page doesn’t persist edits, since I didn’t want to complicate my static website with a database hookup for persistence. I’m okay with that for now, since I only rarely update my CV, and I don’t need the page to save work. Also, if I really want to make minor tweaks, I can just update the exported static HTML page.</p>

<p>That said, the next thing to add to my CV builder would be persistence, so a visitor could save their work and load previous versions.</p>

<h1 id="lessons-learned">Lessons Learned</h1>

<ol>
  <li><strong>Start simple</strong>: Claude’s Artifacts tool was perfect for rapid prototyping</li>
  <li><strong>Think about your users</strong>: localStorage is great for personal tools, but not for public content</li>
  <li><strong>Static sites have constraints</strong>: But creative solutions can work around them</li>
  <li><strong>AI assistants are incredible collaborators</strong>: Claude helped me think through architectural decisions, not just write code</li>
</ol>

<h1 id="try-it-yourself">Try It Yourself</h1>

<p>The code is all open source in my <a href="https://github.com/bpurinton/bpurinton.github.io" target="_blank">GitHub repository</a>. Feel free to adapt it for your own needs!</p>

<p>Building this CV builder was a fun exercise in creative problem-solving. It’s not every day you get to combine academic credentials, web development skills, and AI assistance to solve a personal productivity problem. But that’s exactly the kind of interdisciplinary thinking I love about my current role bridging research and education technology.</p>

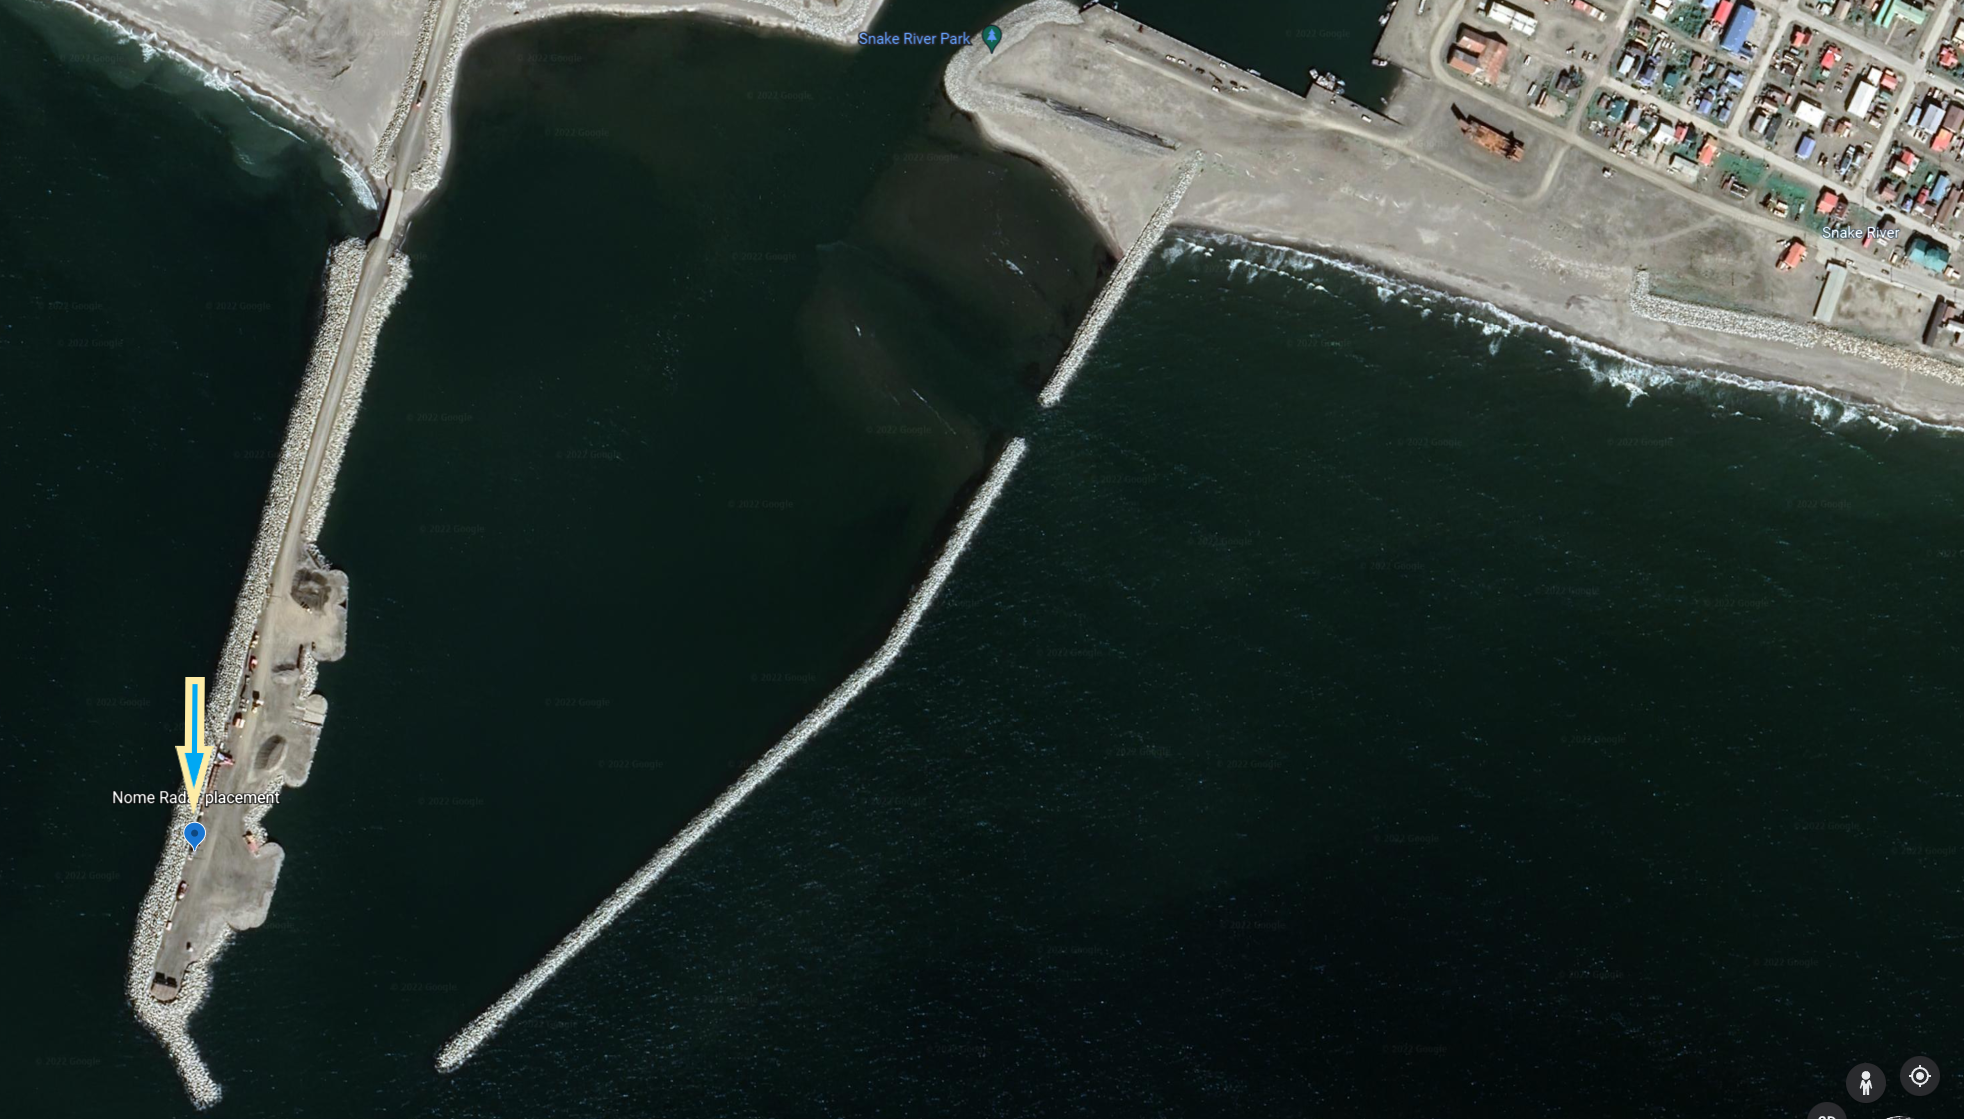
<p>Now if you’ll excuse me, I need to go update my CV… which is now as easy as clicking <a href="/cv-builder" target="_blank">CV Builder</a> and typing! 🚀</p>]]></content><author><name>Ben Purinton</name></author><category term="web-development" /><category term="javascript" /><category term="claude-ai" /><category term="cv-builder" /><category term="html" /><category term="css" /><summary type="html"><![CDATA[How I built a dynamic, printable CV builder for my Jekyll site using Claude's new Artifacts feature and some creative problem-solving]]></summary></entry><entry><title type="html">Exploring Nome’s Sea Ice with Satellite and Ground Radar</title><link href="https://bendirt.com/sea-ice-radar/" rel="alternate" type="text/html" title="Exploring Nome’s Sea Ice with Satellite and Ground Radar" /><published>2023-04-12T00:00:00+00:00</published><updated>2023-04-12T00:00:00+00:00</updated><id>https://bendirt.com/sea-ice-radar</id><content type="html" xml:base="https://bendirt.com/sea-ice-radar/"><![CDATA[<p>I recently found out about <a href="https://seaice.alaska.edu/gi/observatories/nome_radar/" target="_blank">UAF’s sea-ice radar monitor</a> at the end of the pier in Nome’s port.</p>

<p><img style="border: 2px solid black" src="https://seaice.alaska.edu/gi/observatories/nome_radar/nome_radar-placement2.png" alt="Pier Radar" width="500" /></p>
<p align="left">
<i>Location of radar in port of Nome. Image from <a href="https://seaice.alaska.edu/gi/observatories/nome_radar/" target="_blank">here</a>.</i>
</p>

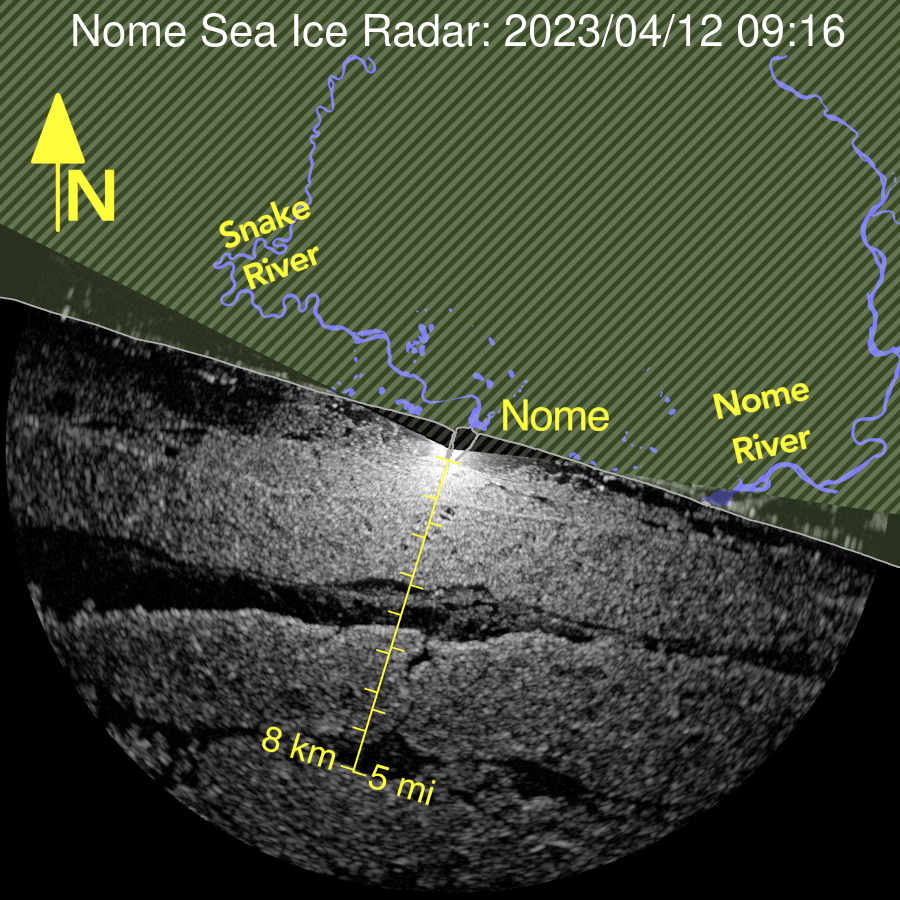
<p><img style="border: 2px solid black" src="/assets/images/nome-pier-radar-4-12.png" alt="Latest Radar" width="500" /></p>
<p align="left">
<i>Latest radar image from the port.</i>
</p>

<p>Naturally, I wanted to investigate how this ground-based radar compares with satellite observations of recent sea ice conditions. Here’s what I found out.</p>

<h1 id="quick-radar-background">Quick radar background</h1>

<p>Radar sensors measure light (a.k.a. radiation) reflected off of surfaces. Just like a human eye; however the wavelength of radar used here is in the centimeter range, which is many many times longer than the visible light our eyes perceive in the nanometer range. In short, we can’t see these radar light waves, but the radar sensors can.</p>

<p>Essentially, these sensors emit radiation (a.k.a. light) at a specific frequency and measure the amount of light returned to the sensor. In general, smoother surfaces reflect more light away (like looking at a mirror from the side) and rougher surfaces reflect more light back towards the sensor.</p>

<p>The exact interaction of the light with sea ice and open water is more complex, but in general <strong>smoother surfaces</strong> like calm open water and smoother sea ice <strong>show up as darker</strong> in the radar image, whereas windy water, sea ice ridges, and a variety of other <strong>rougher surfaces</strong> from sea ice <strong>show up as lighter</strong> in the radar image.</p>

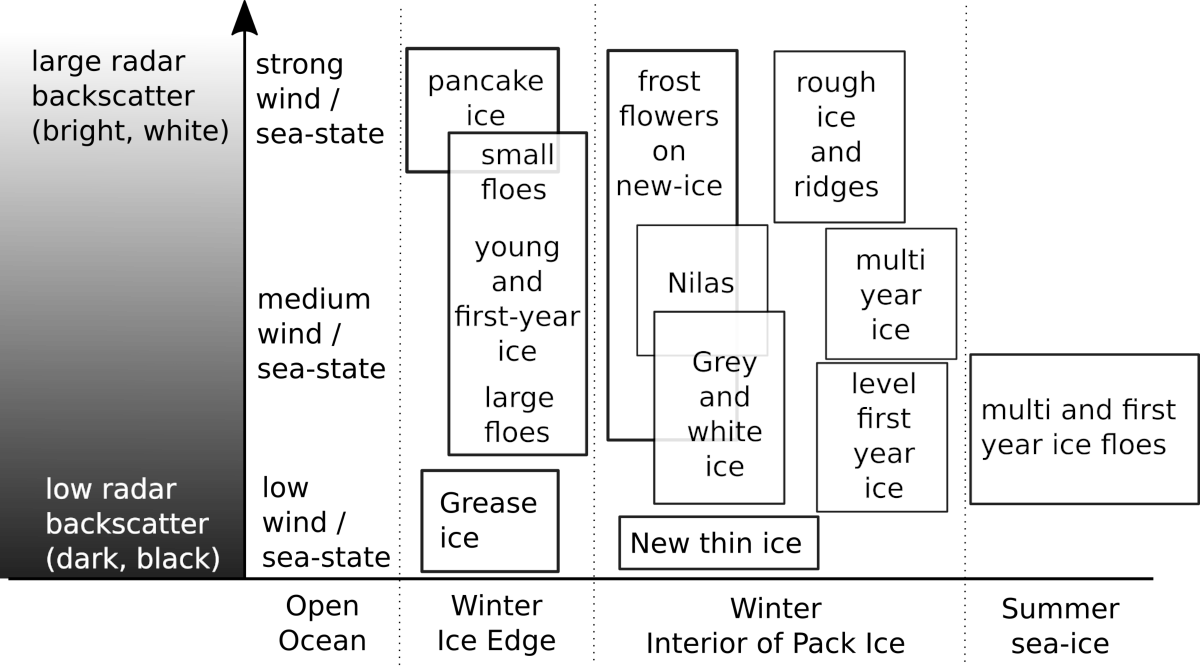
<p><strong>BIG DISCLAIMER:</strong> The interpretation of sea ice from radar images is very difficult, and I am not an expert. Always use extreme caution when venturing out on the ice pack. <a href="https://driftnoise.com/sentinel-1-information.html" target="_blank">This is an excellent guide</a> to sea ice interpretation from radar, and here’s an image showing the general relationship and myriad complications of measuring sea ice extent and type from radar imagery:</p>

<p><img style="border: 2px solid black" src="https://driftnoise.com/static/images/s1_backscatter_qualitative.png" alt="Radar and Sea Ice" width="500" /></p>
<p align="left">
<i>Image from <a href="https://driftnoise.com/sentinel-1-information.html" target="_blank">here</a>, based on modification of <a href="http://articles.adsabs.harvard.edu//full/1996ESASP.383..291J/0000291.000.html" target="_blank">Johannessen et al. (1997)</a></i>
</p>

<p>The basic thing to keep in mind is:</p>

<ul>
  <li>smoother = low radar backscatter = darker in radar image</li>
  <li>rougher = high radar backscatter = lighter in radar image</li>
</ul>

<h1 id="on-to-the-good-stuff">On to the good stuff</h1>

<p>With that out of the way, let’s look at some pretty pictures.</p>

<h2 id="what-does-it-actually-look-like">What does it <em>actually</em> look like?</h2>

<p>Before we get into the weird world of radar, how does it look with our own eyes on the coast off of Nome right now?</p>

<p><img style="border: 2px solid black" src="/assets/images/sea-ice-office.jpg" alt="Sea Ice Picture" width="500" /></p>

<p>That’s a picture from today. You can see the relatively smoother, stable, older ice near-shore and then some ridges of rafted ice about one or two kilometers out in the distance.</p>

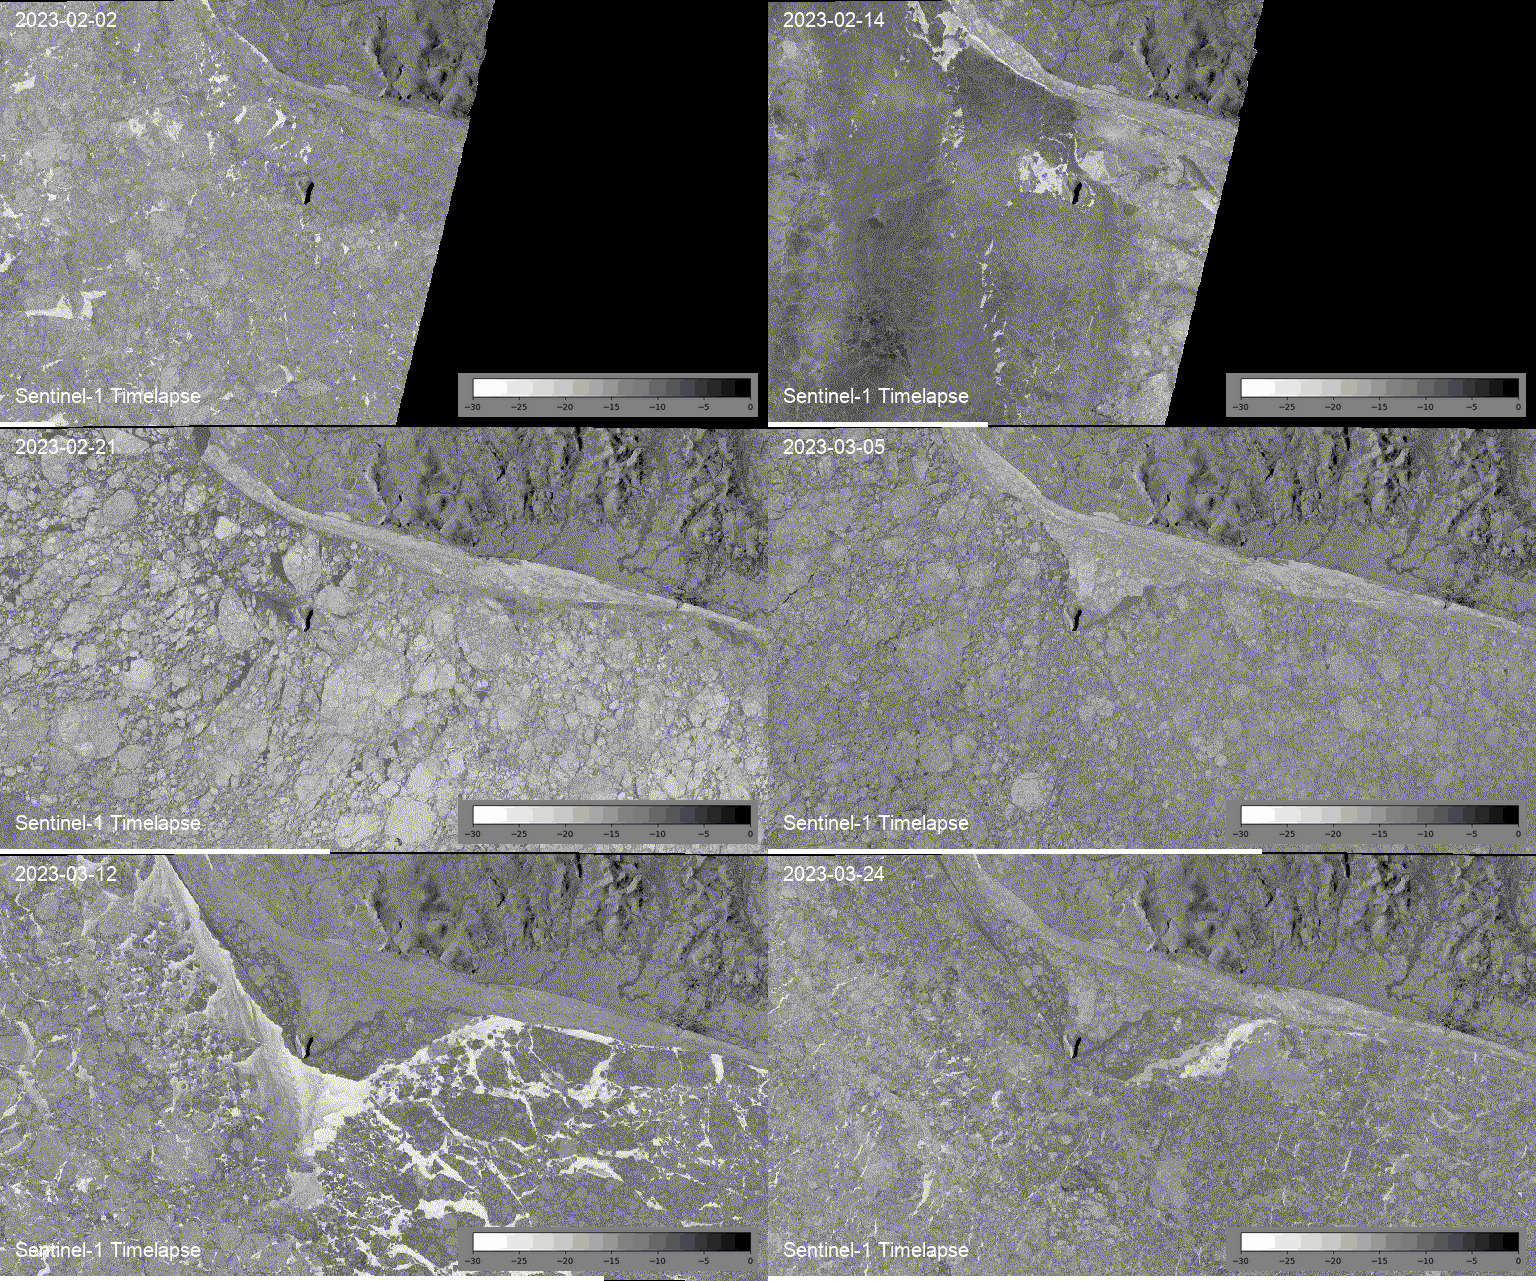
<h2 id="sentinel-1-satellite-radar">Sentinel-1 Satellite Radar</h2>

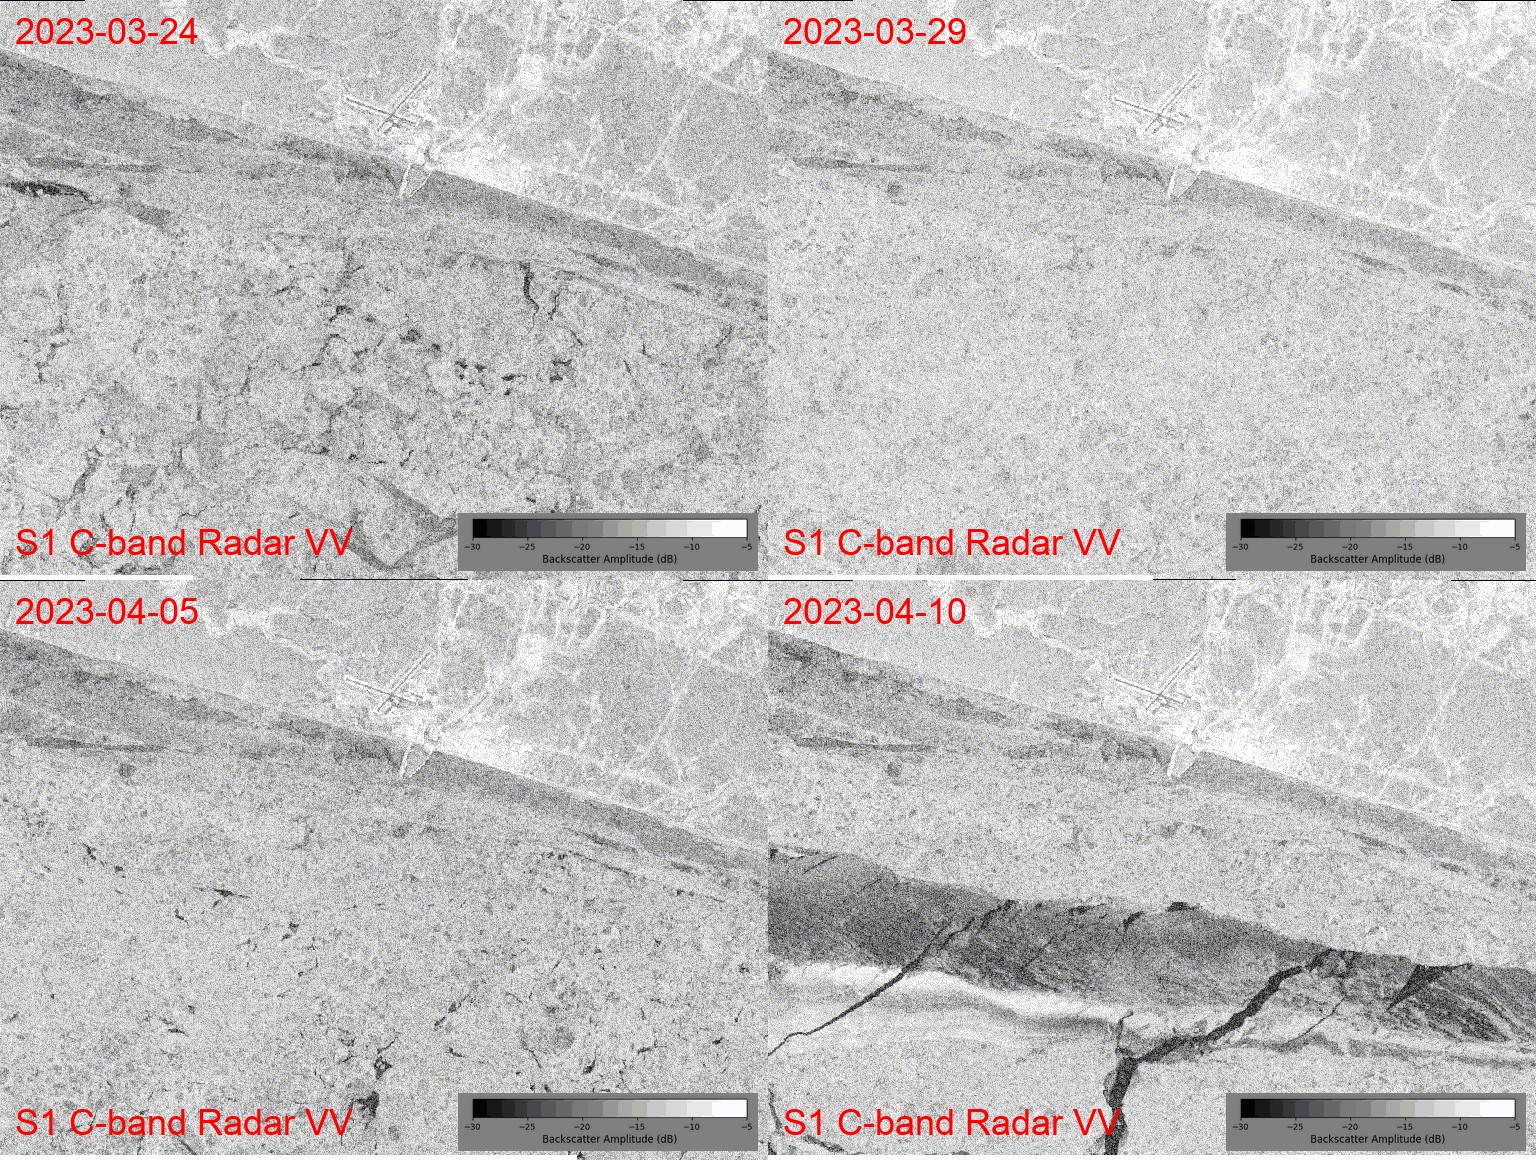
<p>The satellite data I want to check out is from the Sentinel-1 satellite pair. These are radar (technically a synthetic aperture radar, or SAR) satellites that have been up in orbit since 2015. The data is free to the public. Unfortunately, <a href="https://sentinels.copernicus.eu/web/sentinel/-/end-of-mission-of-the-copernicus-sentinel-1b-satellite/1.5" target="_blank">one of these pair was recently decommissioned</a>, so rather than getting an image every day or two in the arctic, we only get one every four or five days.</p>

<p>Here’s a timelapse of sea ice from a few days when the satellite was passing over Nome in the past few weeks:</p>

<p><img src="/assets/images/sentinel1-VV.gif" alt="" /></p>

<p>(I made the Sentinel timelapse images throughout this post using <a href="https://geemap.org/" target="_blank">Google Earth Engine</a>.)</p>

<p>For reference, the cross in the top center of the timelapse is the airport (each arm of the cross is a runway), and the town of Nome is the bright (white) patch just east of the airport. The Bering Sea is everything south of the east-west oriented coastline and the port is the white arm sticking out into the sea off of the coast.</p>

<p>And look! The runways are a smooth surface, and they appear dark in the radar image (low backscatter), whereas town is very rough (lots of buildings) and thus appears very light in the radar image (high backscatter).</p>

<p>If we keep in mind that general rule, then we can interpret the whiter pixels in the Bering Sea as rough sea ice. Although it could also be rough, windy seas, but the winds have not been especially strong these first few weeks of April. On the other hand, it has been <em>very, very cold</em> (record breaking for April in fact). So white = rough sea ice, and that makes the darker black pixels open water. Pixels in between black and white might be some of that smoother ice like we saw in my photo just off the coast.</p>

<p>Look how much it’s changing a few kilometers off of the coast in the two weeks shown in this timelapse! Neat! (And tread carefully out there.)</p>

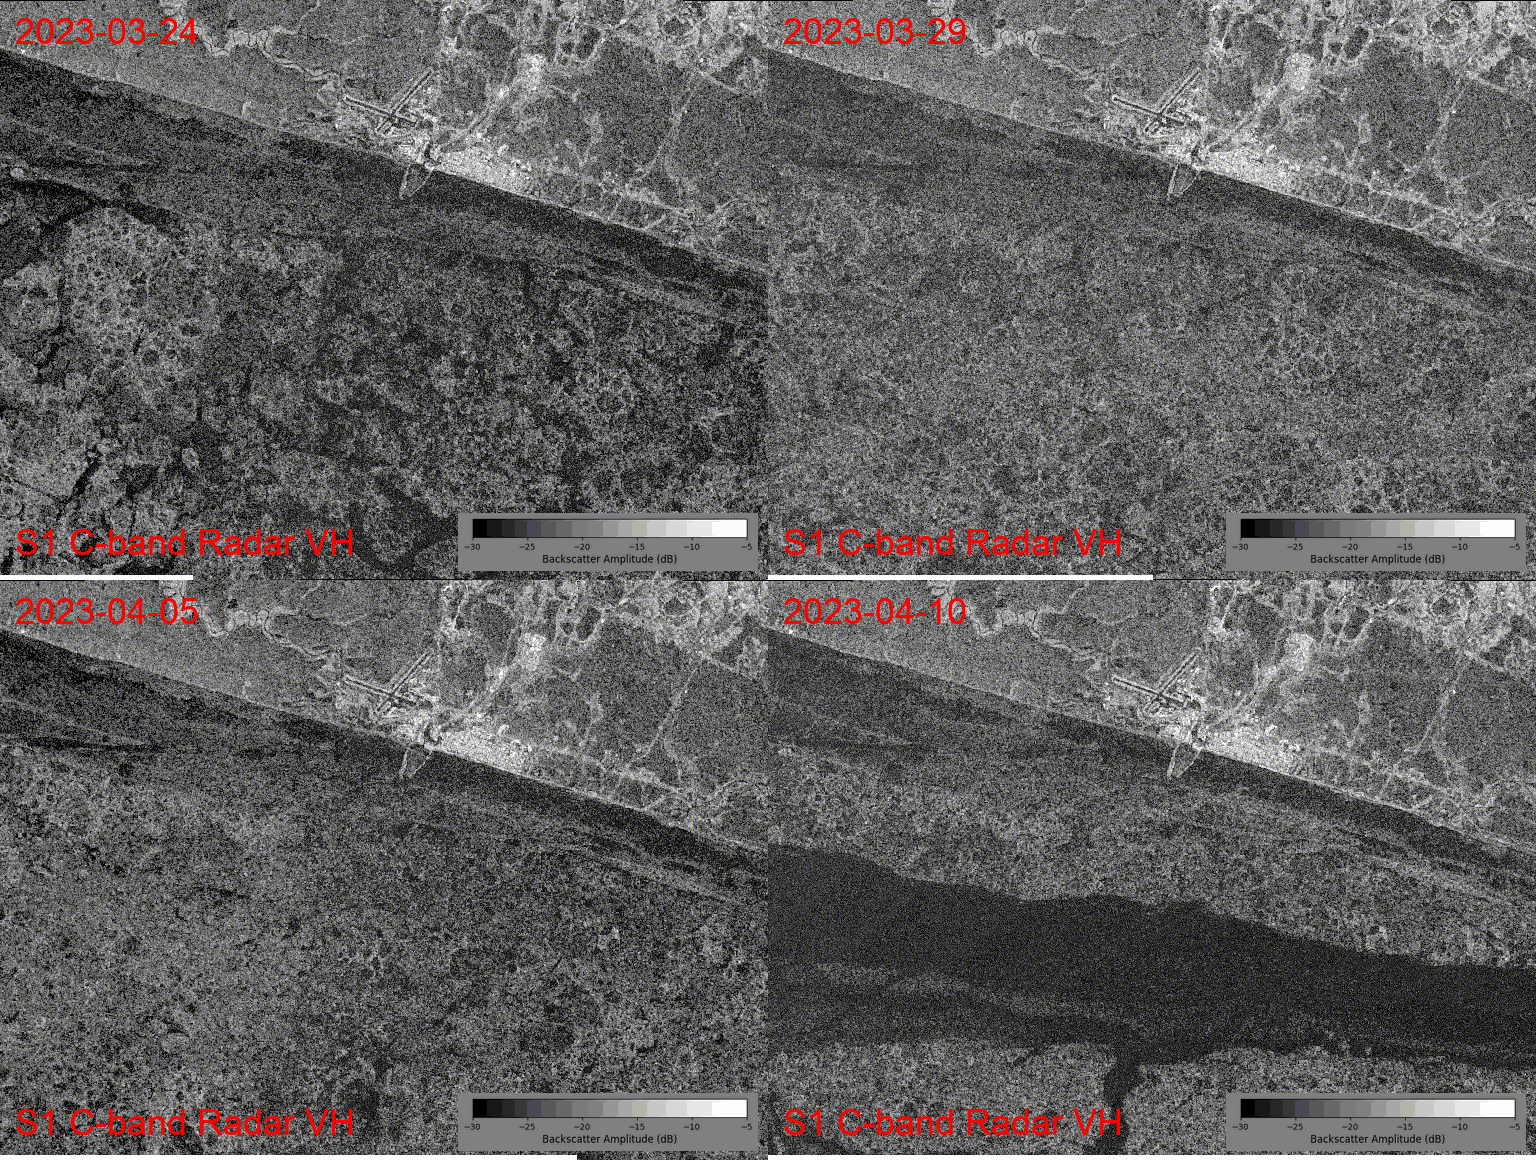
<h3 id="what-about-the-other-polarization">What about the other polarization?</h3>

<p>Okay, true, I only showed the VV (vertical-vertical) polarized timelapse, but we can also look at the cross-polarized (vertical-horizontal, or VH) image from Sentinel-1. There are differences in the sea-ice interaction between these two modes of sensor operation, but in general the results are similar, showing near-shore consistent ice pack and a lot of movement nearby off shore:</p>

<p><img src="/assets/images/sentinel1-VH.gif" alt="" /></p>

<p>I also really like how the radar images show the smoother (darker pixels) on the land north of the coastline, where the tundra is covered in several meters of mostly smooth snow. The lighter pixels on the land are a mixture of human infrastructure (buildings, roads, mining operations) and natural, rough features occurring in river valleys (willows poking up through the snow).</p>

<h2 id="radar-from-port">Radar From Port</h2>

<p>It looks like something happened between April 5th and 10th that dramatically changed the ice extent and opened up a large amount of open water a few kilometers off of the coast. Unfortunately, we only have a limited number of satellite scenes, so we can’t fill those gaps from the current data.</p>

<p>But, how do the ground-based port radar measurements represent this time period?</p>

<p>A couple of notes in comparison to the Sentinel-1 satellite: the ground based radar has a much higher spatial resolution (each pixel shows a smaller area), it has a much higher temporal resolution (the timelapse is composed of one image every four minutes), and the radar wavelength is shorter (by about half).</p>

<p>Regardless of these differences, the same general rule of darker = smoother and lighter = rougher hold for interpreting this video timelapse courtesy of UAF (Press the play button to watch it):</p>

<figure class="video_container">
<video style="border: 2px solid black" width="600" controls="true">
  <source src="/assets/videos/Nome_20230407to20230409.mp4" type="video/mp4" />
</video>
</figure>
<p align="left">
<i>Sea ice radar timelapse from April 7th, 8th, 9th <a href="https://seaice.alaska.edu/gi/observatories/nome_radar/" target="_blank">from here</a></i>
</p>

<p>Clearly in the early morning on April 8th, a big raft of ice broke off and began floating away, opening things up like we saw in the satellite! Thanks, port radar!</p>

<p>There are a lot of differences compared to the satellite imagery (also in the extent of coverage, where the ground measurement is only showing an eight kilometer radius from the pier), but clearly the data is complementary and show generally similar trends:</p>

<p>Nearby the shore we currently have pretty stable ice, but a few kilometers out we have frequent changes in the ice pack. Let’s see how long into the spring this ice lasts.</p>

<h2 id="hold-up-why-not-optical-images">Hold up, why not optical images?</h2>

<p>Radar is neat and all, but we also have a bunch of optical satellites orbiting the earth, like Landsat and Sentinel-2. Why not just use these easy-to-interpret pictures from space?</p>

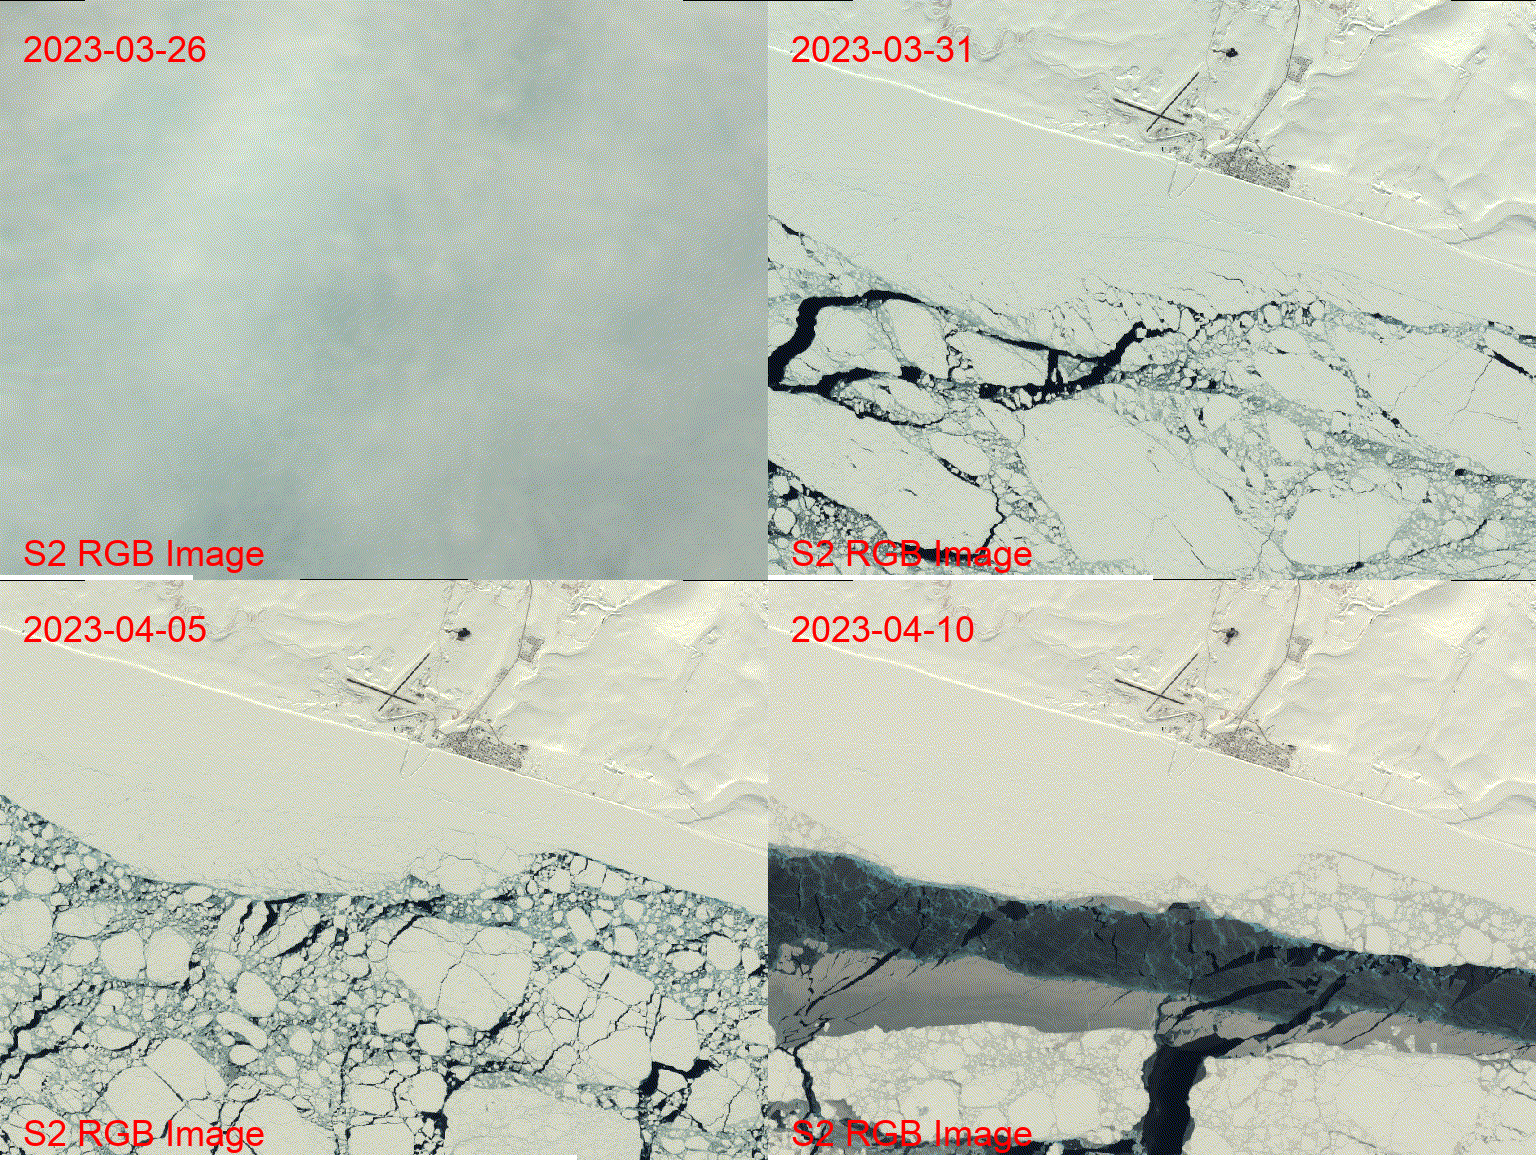
<p>Well, in this case, we actually do have some nice Sentinel-2 imagery to corroborate the radar data (ice becoming open water):</p>

<p><img src="/assets/images/sentinel2-with-text.gif" alt="" /></p>

<p>But, the first image in this timelapse from March 26th shows the issue with optical data: it doesn’t penetrate cloud cover. And cloudy days are pretty frequent, making it difficult to get the consistent measurement of sea ice that radar offers with its ability to “see through” any cloud cover.</p>]]></content><author><name>Ben Purinton</name></author><category term="geemap" /><category term="sentinel" /><category term="sar" /><category term="nome" /><category term="sea-ice" /><summary type="html"><![CDATA[I recently found out about UAF’s sea-ice radar monitor at the end of the pier in Nome’s port.]]></summary></entry><entry><title type="html">Running dockerized google earth engine (GEE) map</title><link href="https://bendirt.com/docker-geemap/" rel="alternate" type="text/html" title="Running dockerized google earth engine (GEE) map" /><published>2023-03-25T00:00:00+00:00</published><updated>2023-03-25T00:00:00+00:00</updated><id>https://bendirt.com/docker-geemap</id><content type="html" xml:base="https://bendirt.com/docker-geemap/"><![CDATA[<p>The steps I took to open and run a dockerized <a href="https://geemap.org/" target="_blank">geemap</a>:</p>

<ol>
  <li>Install docker and learn some useful commands</li>
  <li>Gather the geemap image from <a href="https://hub.docker.com/r/bkavlak/geemap">https://hub.docker.com/r/bkavlak/geemap</a> with a <code class="language-plaintext highlighter-rouge">docker pull</code> because it seemed like the most updated. I did not follow the instructions for staring things there exactly. I also used a nice <a href="https://www.youtube.com/watch?v=X1qbmmIfD74&amp;ab_channel=SimonMariusMudd">youtube video from Simon Mudd</a>. So the following instructions are somewhat bespoke.</li>
  <li>Make a local directory <code class="language-plaintext highlighter-rouge">~/geemap-data</code> which will be the bridge between the container running the application and my local computer</li>
  <li>Start the docker container based on the image by running:
    <div class="language-bash highlighter-rouge"><div class="highlight"><pre class="highlight"><code> docker run <span class="nt">-it</span> <span class="nt">--name</span> geemap <span class="nt">-p</span> 8888:8888 <span class="nt">-v</span> ~/geemap-data:/geemap/data bkavlak/geemap:latest
</code></pre></div>    </div>
  </li>
  <li>This will put me inside the container, where I should see the <code class="language-plaintext highlighter-rouge">data</code> directory that is connected to my <code class="language-plaintext highlighter-rouge">~/geemap-data</code> local folder.</li>
  <li>Start a jupyter environment by running:
    <div class="language-bash highlighter-rouge"><div class="highlight"><pre class="highlight"><code> jupyter lab <span class="nt">--ip</span><span class="o">=</span>0.0.0.0 <span class="nt">--port</span><span class="o">=</span>8888 <span class="nt">--allow-root</span>
</code></pre></div>    </div>
  </li>
  <li>Open <code class="language-plaintext highlighter-rouge">localhost:8888</code> and copy-paste the unique <code class="language-plaintext highlighter-rouge">token=...</code> into the browser.</li>
  <li>Start a notebook and run <code class="language-plaintext highlighter-rouge">ee.Authenticate()</code> to go through the pipeline of getting an authentication token. This needs to be done everytime I open the container. There’s probably a way around this but it’s not a huge deal to re-authenticate when I’m starting work for the day.</li>
  <li>Work away and save everything into <code class="language-plaintext highlighter-rouge">data/</code> (which will pipe it to my local <code class="language-plaintext highlighter-rouge">~/geemap-data</code> folder).</li>
  <li>When I exit the container, I also need to delete it or it won’t open next time due to the name being taken. I have tried to just re-open the container, but I’m having problems there. Again, not ideal but it works for now! This is how I drop the container (the image stays though so it makes for quick rebooting from step 4 above):
    <div class="language-bash highlighter-rouge"><div class="highlight"><pre class="highlight"><code>docker ps <span class="nt">-a</span>
docker <span class="nb">rm</span> <span class="nt">-f</span> &lt;container-ID&gt;
</code></pre></div>    </div>
  </li>
</ol>

<p>Now I can make some sweet maps:</p>

<p><img src="/assets/images/sentinel1.gif" alt="" /></p>

<h1 id="some-more-notes-on-docker">Some more notes on docker</h1>

<p>On my M2 Mac with <code class="language-plaintext highlighter-rouge">arm64</code> Apple Silicon architecture, I need to build images by adding <code class="language-plaintext highlighter-rouge">FROM --platform=linux/amd64 &lt;parent-image&gt;</code> to the top of the <code class="language-plaintext highlighter-rouge">Dockerfile</code>.</p>

<p>Then I can build as usual with <code class="language-plaintext highlighter-rouge">docker build -t &lt;image-name&gt; .</code></p>

<p>Then when I want to run an image locally I need to supply the platform with <code class="language-plaintext highlighter-rouge">docker run -it --platform linux/amd64 &lt;image-name&gt;</code></p>]]></content><author><name>Ben Purinton</name></author><category term="docker" /><category term="geemap" /><category term="python" /><category term="jupyter" /><summary type="html"><![CDATA[The steps I took to open and run a dockerized geemap:]]></summary></entry><entry><title type="html">Notes on using git</title><link href="https://bendirt.com/notes-on-git/" rel="alternate" type="text/html" title="Notes on using git" /><published>2023-03-18T00:00:00+00:00</published><updated>2023-03-18T00:00:00+00:00</updated><id>https://bendirt.com/notes-on-git</id><content type="html" xml:base="https://bendirt.com/notes-on-git/"><![CDATA[<p>I’m currently going through the <em>extremely</em> helpful <a href="https://thoughtbot.com/upcase/videos/git-getting-to-confident" target="_blank">thoughtbot git tutorial</a>. I want to leave some notes here for future reference.</p>

<h1 id="git-aliases">Git Aliases</h1>

<p>Before I get into the notes, here’s a bit about <code class="language-plaintext highlighter-rouge">.gitconfig</code>. This dot file is found in two locations:</p>

<ul>
  <li><code class="language-plaintext highlighter-rouge">~/.gitconfig</code>: the home directory for my terminal, where the <code class="language-plaintext highlighter-rouge">global</code> options are set</li>
  <li><code class="language-plaintext highlighter-rouge">git-project-directory/.git/.config</code>: the <code class="language-plaintext highlighter-rouge">.git/</code> directory of a git repo, where the <code class="language-plaintext highlighter-rouge">local</code> options are set</li>
</ul>

<p>You can add aliases and other things to the <code class="language-plaintext highlighter-rouge">global</code> or <code class="language-plaintext highlighter-rouge">local</code> configuration using the command line syntax</p>

<div class="language-bash highlighter-rouge"><div class="highlight"><pre class="highlight"><code>git config <span class="nt">--global</span> alias.p push
</code></pre></div></div>

<p>or (for a longer one):</p>

<div class="language-bash highlighter-rouge"><div class="highlight"><pre class="highlight"><code>git config <span class="nt">--global</span> alias.as <span class="s2">"!git add -A &amp;&amp; git stash"</span>
</code></pre></div></div>

<p>Do a <code class="language-plaintext highlighter-rouge">more ~/.gitconfig</code> to view the changes, or even add more complex ones by opening the file in an editor.</p>

<p>At any time, I can remind myself what an alias is actually doing by running, e.g.:</p>

<div class="language-bash highlighter-rouge"><div class="highlight"><pre class="highlight"><code>git <span class="nb">help </span>as
</code></pre></div></div>

<h1 id="getting-confident">Getting Confident</h1>

<p>The <a href="https://thoughtbot.com/upcase/videos/git-getting-to-confident" target="_blank">first video</a> covers some basics to get us feeling comfortable.</p>

<p>It starts by introducing the look of the git command line.</p>

<h2 id="git-context-at-prompt">Git Context at prompt</h2>

<p>A good terminal prompt will show:</p>

<ul>
  <li>whether you are in a git repo</li>
  <li>what branch you are on in that git repo</li>
  <li>a “dirty” status symbol if there are changed and un-committed</li>
</ul>

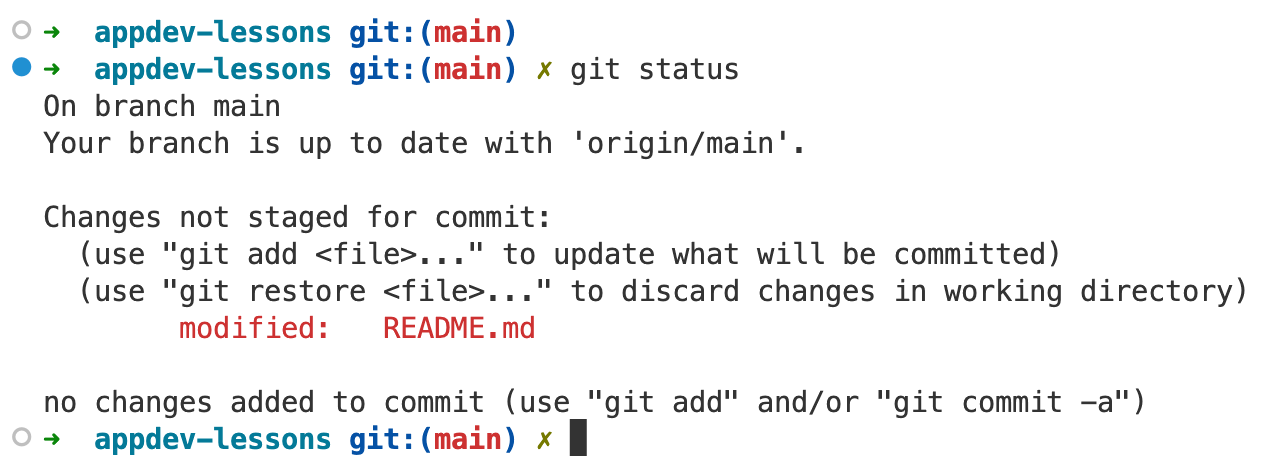
<p>I use <a href="https://iterm2.com/" target="_blank">iTerm2</a> combined with <a href="https://ohmyz.sh/" target="_blank">oh my zsh</a>, which gives my terminal a great look and feel:</p>

<p><img src="/assets/images/git-command-line-look.png" alt="" /></p>

<p>The branch is <code class="language-plaintext highlighter-rouge">(main)</code> and there’s a little <code class="language-plaintext highlighter-rouge">x</code> symbol next to the prompt when I have un-committed files.</p>

<h2 id="git-stash">Git Stash</h2>

<p><code class="language-plaintext highlighter-rouge">git stash</code> is the command to “stash” any changes since the last commit that you might want, or might not, and you just want to save them somewhere. Eventually the stash is deleted so this is just a temporary holding area.</p>

<p>I have the alias <code class="language-plaintext highlighter-rouge">git as</code> setup, which first adds all untracked files and then stashes them (stash only takes tracked files by default).</p>

<h2 id="reflog">Reflog</h2>

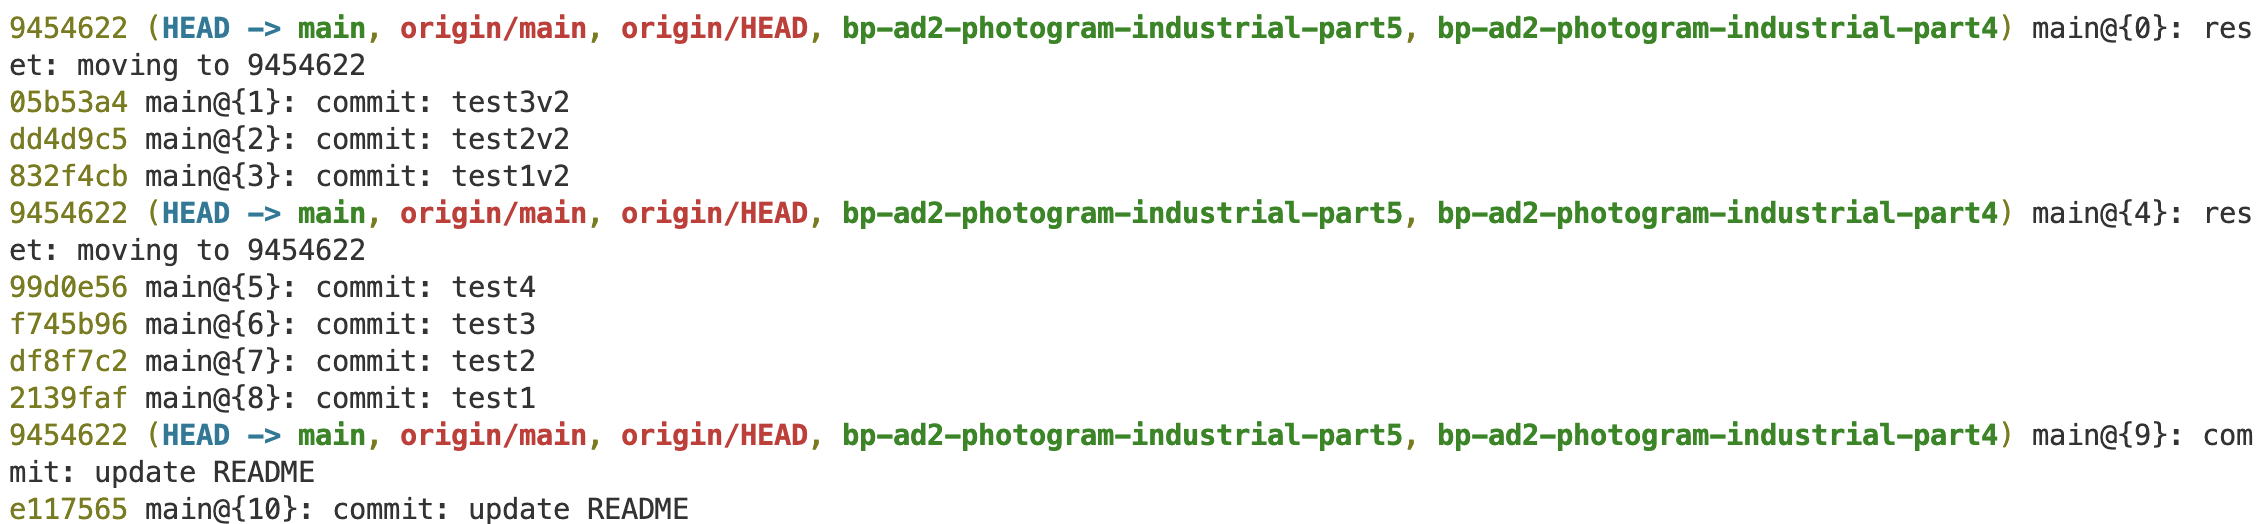
<p>The <code class="language-plaintext highlighter-rouge">git reflog</code> command is great, it lists every command we ran in a repo that changed what we have checked out: every <code class="language-plaintext highlighter-rouge">commit</code>, <code class="language-plaintext highlighter-rouge">branch</code>, <code class="language-plaintext highlighter-rouge">rebase</code>, etc.</p>

<p>Writing:</p>

<div class="language-bash highlighter-rouge"><div class="highlight"><pre class="highlight"><code>git reflog branch-name
</code></pre></div></div>

<p>shows us just the actions on that specific branch:</p>

<p><img src="/assets/images/git-reflog-main.png" alt="" /></p>

<h3 id="note-on-colors">Note on colors</h3>

<ul>
  <li><strong>yellow = commit hash</strong>; this is the identifier for this state of the code</li>
  <li><strong>blue = HEAD</strong>; this indicates where I am currently checked out with the <code class="language-plaintext highlighter-rouge">-&gt;</code> symbol pointing at a local or remote branch that I am currently on</li>
  <li><strong>green = local branch</strong>; this is a branch on my local machine</li>
  <li><strong>red = remote branch</strong>; this is branch on Github</li>
  <li><strong>black = command or commit message</strong>; this is the text describing what the line refers to</li>
</ul>

<h2 id="reset---hard-with-reflog"><code class="language-plaintext highlighter-rouge">reset --hard</code> with reflog</h2>

<p>I can use the reflog to reset my code to any previous state! This command moves the <code class="language-plaintext highlighter-rouge">HEAD</code> pointer to some previous commit with the hash <code class="language-plaintext highlighter-rouge">9454622</code>:</p>

<div class="language-bash highlighter-rouge"><div class="highlight"><pre class="highlight"><code>git reset <span class="nt">--hard</span> 9454622
</code></pre></div></div>

<p>With that powerful command, we don’t need to worry about messing things up!</p>

<h1 id="viewing-history">Viewing history</h1>

<p>The <a href="https://thoughtbot.com/upcase/videos/git-managing-history" target="_blank">second video</a> covers how we view the history. There’s a bunch of things in there about viewing granular details of file changes and searching the history with <code class="language-plaintext highlighter-rouge">grep</code>. Good to know, but here are just a few important commands.</p>

<div class="language-bash highlighter-rouge"><div class="highlight"><pre class="highlight"><code>git log
</code></pre></div></div>

<p>or</p>

<div class="language-bash highlighter-rouge"><div class="highlight"><pre class="highlight"><code>git log <span class="nt">--oneline</span> <span class="nt">--decorate</span>
</code></pre></div></div>

<p>To view a linear history of the repository. I have this aliased as <code class="language-plaintext highlighter-rouge">git sl</code>.</p>

<div class="language-bash highlighter-rouge"><div class="highlight"><pre class="highlight"><code>git log <span class="nt">--pretty</span><span class="o">=</span>format:<span class="s1">'%C(yellow)%h%C(reset) - %an [%C(green)%ar%C(reset)] %s'</span>
</code></pre></div></div>

<p>To view the commits, who made them, when they made them (in green), and the one line summary. I have this aliased as <code class="language-plaintext highlighter-rouge">git pl</code>.</p>

<div class="language-bash highlighter-rouge"><div class="highlight"><pre class="highlight"><code>git show 0302t5
</code></pre></div></div>

<p>To show the commit information and a <code class="language-plaintext highlighter-rouge">git diff</code> of the changed files.</p>

<h2 id="the-git-graph">The git graph</h2>

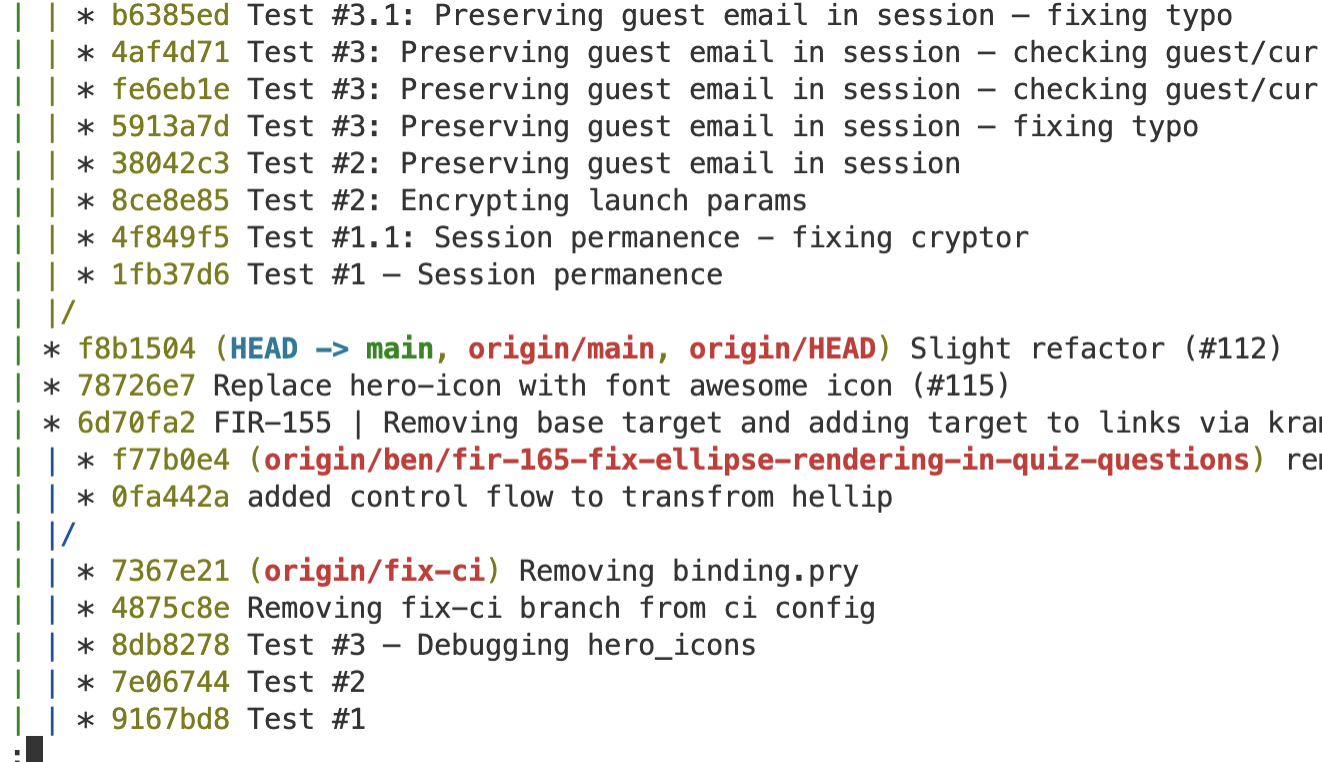
<p>This is important but confusing at time. <a href="#note-on-colors">Recall the color notes</a>.</p>

<div class="language-bash highlighter-rouge"><div class="highlight"><pre class="highlight"><code>git log <span class="nt">--oneline</span> <span class="nt">--decorate</span> <span class="nt">--graph</span> <span class="nt">--all</span>
</code></pre></div></div>

<p>To view a graph showing the relation between branches. I have this aliased as <code class="language-plaintext highlighter-rouge">git sla</code>.</p>

<p><img src="/assets/images/git-sla-graph.png" alt="" /></p>

<p><a href="https://stackoverflow.com/questions/5382255/how-to-read-git-log-graph" target="_blank">Here is a good SO answer on how to read the graph</a>. Some notes:</p>

<ul>
  <li>The top is the most recent, the bottom is the oldest</li>
  <li>Branches are <code class="language-plaintext highlighter-rouge">|</code> vertical lines</li>
  <li>The <code class="language-plaintext highlighter-rouge">*</code> tells you which branch the commit is referring to.</li>
  <li>Where two branches come together or converge (i.e.: <code class="language-plaintext highlighter-rouge">|\</code>), that’s a merge. Where they split or diverge (i.e.: <code class="language-plaintext highlighter-rouge">|/</code>), that’s where the branch was created/taken off of.</li>
  <li>Therefore, to read the development of a branch, start with where it splits off, read the log entries for any lines corresponding to a <code class="language-plaintext highlighter-rouge">*</code> in that branch’s vertical line, and follow it until it merges again. Note that not every log entry will be relevant, only those with a <code class="language-plaintext highlighter-rouge">*</code> on the branch in question. Sometimes branches are taken from far back, which means they have to ‘jump over’ a lot of commits when they’re merged.</li>
</ul>

<h1 id="undoing">Undoing</h1>

<p>The <a href="https://thoughtbot.com/upcase/videos/git-undoing" target="_blank">third video</a> covers how we undo mistakes.</p>

<p>My main takeaway here, is that we can use <code class="language-plaintext highlighter-rouge">git add file-name</code> to add an unstaged file and then add that file to the previous commit (where maybe we left it out accidentally) with:</p>

<h2 id="ammend-commit">Ammend commit</h2>

<div class="language-bash highlighter-rouge"><div class="highlight"><pre class="highlight"><code>git commit <span class="nt">--amend</span> <span class="nt">--no-edit</span>
</code></pre></div></div>

<p>or</p>

<div class="language-bash highlighter-rouge"><div class="highlight"><pre class="highlight"><code>git commit <span class="nt">--amend</span>
</code></pre></div></div>

<p>which will allow us to actually edit the previous commit message.</p>

<h2 id="unstage-a-file">Unstage a file</h2>

<p>We can also <strong>un-stage</strong> a file (maybe because it doesn’t make sense to include with the commit because it is unrelated to the other files!) with:</p>

<div class="language-bash highlighter-rouge"><div class="highlight"><pre class="highlight"><code>git reset file-name
</code></pre></div></div>

<p>I have this aliased to <code class="language-plaintext highlighter-rouge">git unstage</code>, because that name makes more sense.</p>

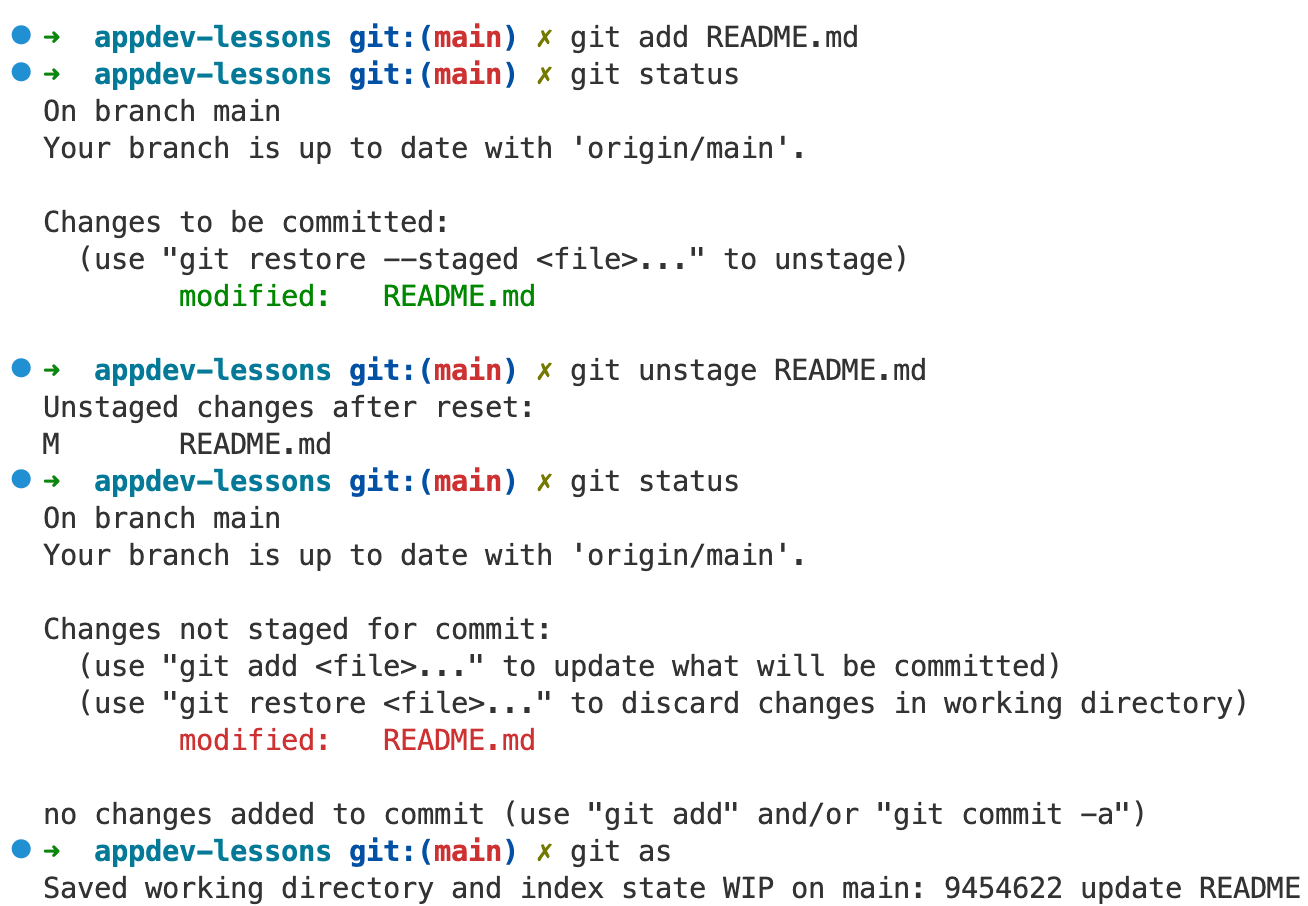
<div class="language-bash highlighter-rouge"><div class="highlight"><pre class="highlight"><code>git status
</code></pre></div></div>

<p>is a command you should run a lot to double check what you’re doing:</p>

<p><img src="/assets/images/git-stage-unstage.png" alt="" /></p>

<h2 id="a-dangerous-checkout">A dangerous checkout</h2>

<p><strong>A dangerous command is</strong>:</p>

<div class="language-bash highlighter-rouge"><div class="highlight"><pre class="highlight"><code>git checkout <span class="nb">.</span>
</code></pre></div></div>

<p>This will back out all of your changes and reset you to the previous commit. If you haven’t staged or committed the changed files, this will <strong>destroy them</strong>.</p>

<h2 id="reset---soft-to-undo-a-commit"><code class="language-plaintext highlighter-rouge">reset --soft</code> to undo a commit</h2>

<p>We can remove a commit from our history and reset the files to their staged state with all of the changes we made with:</p>

<div class="language-bash highlighter-rouge"><div class="highlight"><pre class="highlight"><code>git reset <span class="nt">--soft</span> HEAD^
</code></pre></div></div>

<ul>
  <li><code class="language-plaintext highlighter-rouge">HEAD</code> refers to the current branch that you are checked out on</li>
  <li><code class="language-plaintext highlighter-rouge">^</code> means one commit back (the “parent”)</li>
  <li><code class="language-plaintext highlighter-rouge">soft</code> means leave the files in the working directory and index untouched</li>
</ul>

<p>Then we could add some more changes to the files and commit again. I have this useful command aliased as <code class="language-plaintext highlighter-rouge">git uncommit</code>.</p>

<h2 id="steps-to-completely-backout-of-a-commit">Steps to completely backout of a commit</h2>

<p>First <code class="language-plaintext highlighter-rouge">git uncommit</code> to re-stage the files, but undo the commit. Then <code class="language-plaintext highlighter-rouge">git unstage</code> (optionally providing a filename we want to unstage, or taking them all by default), to unstage the files. Then, the <em>dangerous</em> <code class="language-plaintext highlighter-rouge">git checkout .</code>, which will completely reset our code and history to how it looked before our most recent edits and commit.</p>

<h1 id="crafting-history-with-rebase">Crafting history with rebase</h1>

<p>The <a href="https://thoughtbot.com/upcase/videos/git-crafting-history" target="_blank">fourth video</a> covers <code class="language-plaintext highlighter-rouge">rebase</code>. There’s a lot in there, but these are some notes on my important takeaways.</p>

<p>The way we want to be working is via commits on a local feature branch, then a merge to main when it’s ready.</p>

<h2 id="patch-and-cherry-pick"><code class="language-plaintext highlighter-rouge">patch</code> and <code class="language-plaintext highlighter-rouge">cherry-pick</code></h2>

<p>We use <code class="language-plaintext highlighter-rouge">git add --patch</code> (rather than <code class="language-plaintext highlighter-rouge">git add .</code>) to selectively stage granular changes <em>within</em> files that we change. This will lead to a partially staged and unstaged file. We can commit, then stage again, then commit again, which will break up the commit based on how we selectively staged with <code class="language-plaintext highlighter-rouge">--patch</code>.</p>

<p>We use <code class="language-plaintext highlighter-rouge">git diff</code> to view the file difference in unstaged changes, or <code class="language-plaintext highlighter-rouge">git diff --cached</code> for the staged changes.</p>

<p>If we accidentally commited to <code class="language-plaintext highlighter-rouge">main</code> when we meant to be on a feature branch, we can use:</p>

<div class="language-bash highlighter-rouge"><div class="highlight"><pre class="highlight"><code>git diff 23532..12352
</code></pre></div></div>

<p>This will show differences in the files in the <strong>range</strong> specified between the two hashes with the <code class="language-plaintext highlighter-rouge">..</code> notation. We use that to check which commits we want to move.</p>

<p>We can then checkout the feature branch: <code class="language-plaintext highlighter-rouge">git checkout feature-branch</code> and run:</p>

<div class="language-bash highlighter-rouge"><div class="highlight"><pre class="highlight"><code>git cherry-pick 23532..12352
</code></pre></div></div>

<p>This will move all the specified commits (we can also just pass a single commit rather than a range) to the feature branch. This will create new commits on the branch, it doesn’t just pick them up and move them. So we will still see those commits in <code class="language-plaintext highlighter-rouge">main</code>’s history. But, we know how to reset <code class="language-plaintext highlighter-rouge">main</code> and cleanup the history <a href="#reset---hard-with-reflog">with a hard reset.</a></p>

<h2 id="rebase"><code class="language-plaintext highlighter-rouge">rebase</code></h2>

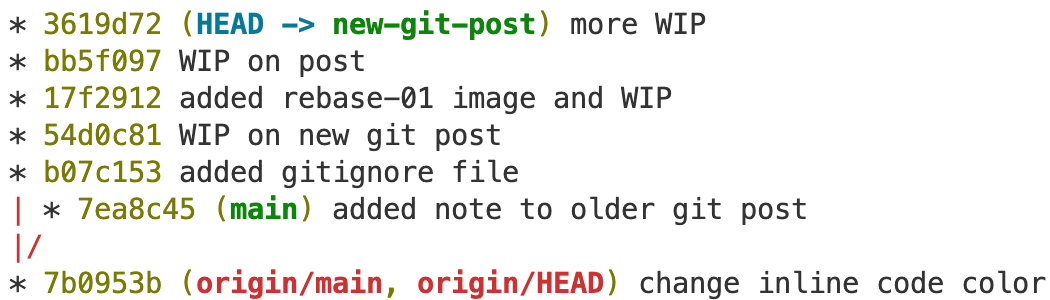
<p>A <code class="language-plaintext highlighter-rouge">rebase</code> is pretty much identical to the <code class="language-plaintext highlighter-rouge">cherry-pick</code> workflow! In this case, we have some stuff (commits) on <code class="language-plaintext highlighter-rouge">main</code> and we want to move them into the <code class="language-plaintext highlighter-rouge">feature-branch</code>.</p>

<p><img src="/assets/images/git-rebase-01.png" alt="" /></p>

<p>Here, I have the commit <code class="language-plaintext highlighter-rouge">7ea8c45</code> on my local (it’s green) <code class="language-plaintext highlighter-rouge">main</code> branch, but I want to move this commit and the changes associated with it into my <code class="language-plaintext highlighter-rouge">new-git-post</code> branch.</p>

<p>The first step is to checkout the feature branch. In my example, I have checked out becuase <code class="language-plaintext highlighter-rouge">HEAD -&gt; new-git-post</code>.</p>

<p>With <code class="language-plaintext highlighter-rouge">rebase</code>, we want to take the work we’ve done on our feature branch (which was <code class="language-plaintext highlighter-rouge">new-git-post</code> here), and reapply it as if it was done on top of the additional commits in our target branch (which was <code class="language-plaintext highlighter-rouge">main</code> here).</p>

<p>Now, I’m going to make couple changes to <code class="language-plaintext highlighter-rouge">new-git-post</code>. Then I realize, oh, I actually would also like the change on the <code class="language-plaintext highlighter-rouge">main</code> branch.</p>

<p><img src="/assets/images/git-rebase-02.png" alt="" /></p>

<p>So we have <code class="language-plaintext highlighter-rouge">b07c153</code> to <code class="language-plaintext highlighter-rouge">3619d72</code>, which are the commits on the feature branch that I’m checked out on, and <code class="language-plaintext highlighter-rouge">7ea8c45</code>, which was the commit on <code class="language-plaintext highlighter-rouge">main</code> that I want in the currently checked out feature branch. Now I can run:</p>

<div class="language-bash highlighter-rouge"><div class="highlight"><pre class="highlight"><code>git rebase main
</code></pre></div></div>

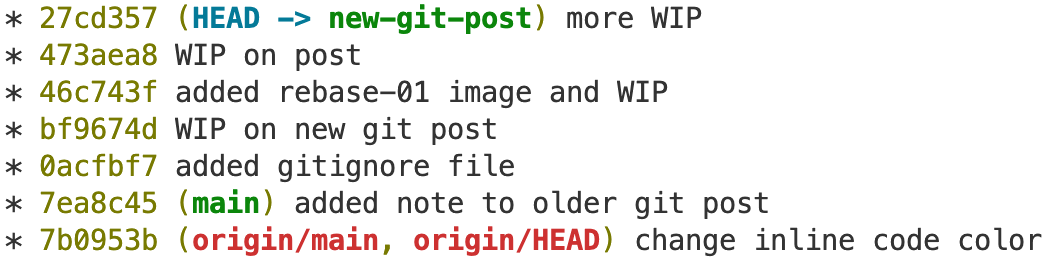
<p>And the resulting history:</p>

<p><img src="/assets/images/git-rebase-03.png" alt="" /></p>

<p>We see that the commit hashes have changed, but now the history appears that the current feature branch is a continuation of main, including the <code class="language-plaintext highlighter-rouge">7ea8c45</code> commit that we wanted to grab.</p>

<h2 id="interactive-rebase">Interactive <code class="language-plaintext highlighter-rouge">rebase</code></h2>

<p>When we want to really craft the history and make the changes clear (like when we’re getting ready to merge to main), then we want to use <code class="language-plaintext highlighter-rouge">rebase -i</code> for interactive rebasing.</p>

<p>This won’t move commits, but rather revises commits <em>in place</em>. We use it to combine or squash commits.</p>

<p><strong>We never want to revise the history like this on <code class="language-plaintext highlighter-rouge">main</code>, but we do want to revise the history of feature branches before merging them to <code class="language-plaintext highlighter-rouge">main</code></strong></p>

<p>Let’s say we wanted to take the top few commits and <code class="language-plaintext highlighter-rouge">s</code>quash them down into one commit. We would do</p>

<div class="language-bash highlighter-rouge"><div class="highlight"><pre class="highlight"><code>git rebase main <span class="nt">-i</span>
</code></pre></div></div>

<p>This would allow me to craft a commit history by <code class="language-plaintext highlighter-rouge">s</code>quashing all the commits except for one that I <code class="language-plaintext highlighter-rouge">p</code>ick (the top-most in the editor). <code class="language-plaintext highlighter-rouge">p</code>icking multiple is almost never worth it (or, alternatively, it means your branches are too long lived).</p>

<p>When I run the command, an editor pops up:</p>

<div class="language-bash highlighter-rouge"><div class="highlight"><pre class="highlight"><code>pick bf9674d WIP on new git post
pick 46c743f added rebase-01 image and WIP
pick 473aea8 WIP on post
pick 27cd357 more WIP
pick 22d9e46 added more images and continued WIP
pick 0afae16 WIP on interactive rebase
pick d105127 WIP
</code></pre></div></div>

<p>I edit that to look like:</p>

<div class="language-bash highlighter-rouge"><div class="highlight"><pre class="highlight"><code>pick bf9674d WIP on new git post
s 46c743f added rebase-01 image and WIP
s 473aea8 WIP on post
s 27cd357 more WIP
s 22d9e46 added more images and continued WIP
s 0afae16 WIP on interactive rebase
s d105127 WIP
</code></pre></div></div>

<p>This will <code class="language-plaintext highlighter-rouge">s</code>quash the subsequent commits after the first commit on the branch (top-most in the editor) down into the first commit. We could <code class="language-plaintext highlighter-rouge">p</code>ick others if there were important ones that stood out.</p>

<p>We get another editor when we close the file, where we wrote a longer description with all of the information about what happened up to the current point in time after the first commit that we <code class="language-plaintext highlighter-rouge">p</code>icked:</p>

<div class="language-bash highlighter-rouge"><div class="highlight"><pre class="highlight"><code>I<span class="s1">'m just squashing some commits to demonstrate
how to interactively rebase.

# This is a combination of 7 commits.
# This is the 1st commit message:

WIP on new git post

# This is the commit message #2:

added rebase-01 image and WIP
</span></code></pre></div></div>

<p>(Note: we could have even deleted all of the commit messages from each individual commit below this note we added.)</p>

<p>And when we close that, our history might look something like:</p>

<p><img src="/assets/images/git-rebase-04.png" alt="" /></p>

<p>And we could continue working on our branch. <strong>But usually, these would be the steps just before we merge to main to create a cleaner history.</strong></p>

<p><strong>Interactive rebasing does not modify the code, it just modifies the commit history!</strong></p>

<h1 id="merging-to-main">Merging to main</h1>

<p>This isn’t in the videos, but just references one of the <a href="https://www.bendirt.com/merging-feature-branch/" target="_blank">other posts on my blog</a>. When the interactive rebase is done, and the history is cleaned, and we’re ready to merge to main, we can run:</p>

<div class="language-bash highlighter-rouge"><div class="highlight"><pre class="highlight"><code>git checkout main
git merge feature-branch
git push
</code></pre></div></div>

<p>And we can even delete the feature branch with</p>

<div class="language-bash highlighter-rouge"><div class="highlight"><pre class="highlight"><code>git branch <span class="nt">-d</span> feature-branch
</code></pre></div></div>]]></content><author><name>Ben Purinton</name></author><category term="git" /><summary type="html"><![CDATA[I’m currently going through the extremely helpful thoughtbot git tutorial. I want to leave some notes here for future reference.]]></summary></entry><entry><title type="html">Git merging main into an in-progress feature-branch</title><link href="https://bendirt.com/merging-feature-branch/" rel="alternate" type="text/html" title="Git merging main into an in-progress feature-branch" /><published>2023-03-17T00:00:00+00:00</published><updated>2023-03-17T00:00:00+00:00</updated><id>https://bendirt.com/merging-feature-branch</id><content type="html" xml:base="https://bendirt.com/merging-feature-branch/"><![CDATA[<p>In a collaborative (or solo) <code class="language-plaintext highlighter-rouge">git</code> project I’m often in a position where I was working on a <code class="language-plaintext highlighter-rouge">feature-branch</code>, got busy, stopped working on it, then came back to it awhile later. In that time, there were changes on <code class="language-plaintext highlighter-rouge">main</code> (formerly <code class="language-plaintext highlighter-rouge">master</code>), that might affect my feature branch.</p>

<p>The question is: how do I merge the changes on <code class="language-plaintext highlighter-rouge">main</code> into my <code class="language-plaintext highlighter-rouge">feature-branch</code>, such that, when I merge the <code class="language-plaintext highlighter-rouge">feature-branch</code> into <code class="language-plaintext highlighter-rouge">main</code> down the road, there is a clean history?</p>

<p>We could <code class="language-plaintext highlighter-rouge">merge --squash</code>, but what we really want for a nice clean history is explained here.</p>

<p><strong>Note, this blog post is a companion to <a href="https://www.bendirt.com/notes-on-git/" target="_blank">this longer post</a></strong></p>

<h1 id="change-the-editor">Change the editor</h1>

<p>Before beginning, it’s nice to change the editor that Github uses away from VIM, which I find to be a pain. On my macbook, I ran:</p>

<div class="language-bash highlighter-rouge"><div class="highlight"><pre class="highlight"><code><span class="nv">$ </span>git config <span class="nt">--global</span> core.editor <span class="s2">"code --wait"</span><span class="sb">`</span>
</code></pre></div></div>

<p>to change the default editor to VS code. The <code class="language-plaintext highlighter-rouge">--wait</code> option freezes the command line until I close the file in the editor.</p>

<h1 id="getting-main-up-to-date">Getting main up to date</h1>

<p>First, I pull main locally:</p>

<div class="language-bash highlighter-rouge"><div class="highlight"><pre class="highlight"><code><span class="nv">$ </span>git checkout main
<span class="o">(</span>main<span class="o">)</span> <span class="nv">$ </span>git pull
</code></pre></div></div>

<p>Once everything is up to date there, I switch back to my branch:</p>

<div class="language-bash highlighter-rouge"><div class="highlight"><pre class="highlight"><code><span class="o">(</span>main<span class="o">)</span> <span class="nv">$ </span>git checkout feature-branch
<span class="o">(</span>feature-branch<span class="o">)</span> <span class="err">$</span>
</code></pre></div></div>

<h2 id="source-vs-target-branch">Source vs. Target Branch</h2>

<p>Quick note here. We are trying to merge like <code class="language-plaintext highlighter-rouge">main --&gt; feature-branch</code>. The branch with added changes we are trying to gather is called the <strong>source branch</strong> (here <code class="language-plaintext highlighter-rouge">main</code>) while the branch you request to merge your changes into is called the <strong>target branch</strong> (here <code class="language-plaintext highlighter-rouge">feature-branch</code>). We want to merge <code class="language-plaintext highlighter-rouge">main</code> (source) <em>into</em> <code class="language-plaintext highlighter-rouge">feature-branch</code> (target).</p>

<h1 id="rebase-into-feature-branch">Rebase into <code class="language-plaintext highlighter-rouge">feature-branch</code></h1>

<p>Now I want to <strong>rebase</strong> the <code class="language-plaintext highlighter-rouge">main</code> <em>into</em> <code class="language-plaintext highlighter-rouge">feature-branch</code>.</p>

<div class="language-bash highlighter-rouge"><div class="highlight"><pre class="highlight"><code><span class="o">(</span>feature-branch<span class="o">)</span> <span class="nv">$ </span>git rebase main
</code></pre></div></div>

<p>I <em>could</em> have added the <code class="language-plaintext highlighter-rouge">-i</code> (or <code class="language-plaintext highlighter-rouge">--interactive</code>) flag, like <code class="language-plaintext highlighter-rouge">git rebase main -i</code>. This would allow me to craft a commit history by <code class="language-plaintext highlighter-rouge">s</code>quashing all the commits except for one that I <code class="language-plaintext highlighter-rouge">p</code>ick (the top-most in the editor). <code class="language-plaintext highlighter-rouge">p</code>icking multiple is almost never worth it (or, alternatively, it means your branches are too long lived). We skip the <code class="language-plaintext highlighter-rouge">-i</code> flag at this stage because we don’t need to make the history clean, we just need to get all the changes from <code class="language-plaintext highlighter-rouge">main</code>. Later, when we merge the feature to main, we will use <code class="language-plaintext highlighter-rouge">-i</code>.</p>

<p>After the <code class="language-plaintext highlighter-rouge">rebase</code>, I need to pull to get all the changes:</p>

<div class="language-bash highlighter-rouge"><div class="highlight"><pre class="highlight"><code><span class="o">(</span>feature-branch<span class="o">)</span> <span class="nv">$ </span>git pull
</code></pre></div></div>

<p>If an error comes up regarding divergent branches, then we need to specify how to reconcile them. We can pass one of the flags <code class="language-plaintext highlighter-rouge">--rebase</code>, <code class="language-plaintext highlighter-rouge">--no-rebase</code>, or <code class="language-plaintext highlighter-rouge">--ff-only</code>. We need to use <code class="language-plaintext highlighter-rouge">--rebase</code> because <code class="language-plaintext highlighter-rouge">--ff-only</code> will fail since the local and remote branches have diverged:</p>

<div class="language-bash highlighter-rouge"><div class="highlight"><pre class="highlight"><code><span class="o">(</span>feature-branch<span class="o">)</span> <span class="nv">$ </span>git pull <span class="nt">--rebase</span>
</code></pre></div></div>

<p>Now I can push:</p>

<div class="language-bash highlighter-rouge"><div class="highlight"><pre class="highlight"><code><span class="o">(</span>feature-branch<span class="o">)</span> <span class="nv">$ </span>git push
</code></pre></div></div>

<p><strong>These two actions take all of the <code class="language-plaintext highlighter-rouge">main</code> commits that occurred since making the feature branch and slots them into the feature branch’s history</strong></p>

<p>And if I check on the open PR for the feature branch, I will see all of the history from <code class="language-plaintext highlighter-rouge">main</code>, and I can continue working on (and making commits) the feature branch.</p>

<h1 id="merge-to-main">Merge to <code class="language-plaintext highlighter-rouge">main</code></h1>

<p>When I’m done with the <code class="language-plaintext highlighter-rouge">feature-branch</code> (meaning I’ve made all the commits I’m going to and pushed them all to Github) and ready to merge to <code class="language-plaintext highlighter-rouge">main</code>, I can</p>

<ul>
  <li>merge on Github using the open PR, including receiving code review and then clicking “Squash and merge”</li>
</ul>

<p>OR <strong>if I want to merge without the PR / code review</strong>:</p>

<ul>
  <li>run these commands:</li>
</ul>

<div class="language-bash highlighter-rouge"><div class="highlight"><pre class="highlight"><code>git checkout main
git pull
git checkout feature-branch
git rebase main <span class="nt">-i</span>
</code></pre></div></div>

<p>At this point, an editor will pop up. I can replace <code class="language-plaintext highlighter-rouge">pick</code> for all but the first commit (top-most in the editor) with <code class="language-plaintext highlighter-rouge">s</code> (for <code class="language-plaintext highlighter-rouge">squash</code>). Then I save and close the file.</p>

<p>Another text editor will open where you can craft <a href="https://chris.beams.io/posts/git-commit/">a wonderful commit message</a> to <a href="https://dhwthompson.com/2019/my-favourite-git-commit" target="_blank">communicate the WHY</a> of your changes (the WHAT is told by the diff).</p>

<p>Now, with the messy history of commits ironed out, we merge the feature to main:</p>

<div class="language-bash highlighter-rouge"><div class="highlight"><pre class="highlight"><code>git checkout main
git merge feature-branch
git push
</code></pre></div></div>

<p>And if we want to delete the remote <code class="language-plaintext highlighter-rouge">feature-branch</code> branch from Github:</p>

<div class="language-bash highlighter-rouge"><div class="highlight"><pre class="highlight"><code>git push origin :feature-branch
</code></pre></div></div>

<p>And locally we can delete the branch with:</p>

<div class="language-bash highlighter-rouge"><div class="highlight"><pre class="highlight"><code>git branch <span class="nt">-d</span> feature-branch
</code></pre></div></div>]]></content><author><name>Ben Purinton</name></author><category term="git" /><category term="rebase" /><summary type="html"><![CDATA[In a collaborative (or solo) git project I’m often in a position where I was working on a feature-branch, got busy, stopped working on it, then came back to it awhile later. In that time, there were changes on main (formerly master), that might affect my feature branch.]]></summary></entry><entry><title type="html">Setting up Ruby on Rails with PostgreSQL</title><link href="https://bendirt.com/ruby-on-rails-with-postgres/" rel="alternate" type="text/html" title="Setting up Ruby on Rails with PostgreSQL" /><published>2023-02-15T00:00:00+00:00</published><updated>2023-02-15T00:00:00+00:00</updated><id>https://bendirt.com/ruby-on-rails-with-postgres</id><content type="html" xml:base="https://bendirt.com/ruby-on-rails-with-postgres/"><![CDATA[<p>I just spent a long time getting my Windows machine setup with Ruby on Rails and the PostgreSQL database in order to work on some software development. Here are the steps I followed.</p>

<h1 id="docker--ruby-on-rails">Docker + Ruby on Rails</h1>

<p>Ideally, I could have set things up as a docker container, with the steps <a href="https://github.com/rails/docked" target="_blank">here</a>, but that didn’t work at all. I had a lot of issues with docker on my machine, which may have come down to my own misunderstanding, or may have had to do with some similar bugs reported <a href="https://forums.docker.com/t/solved-docker-failed-to-start-docker-desktop-for-windows/106976" target="_blank">here</a> or <a href="https://stackoverflow.com/questions/67406780/not-able-to-start-docker-desktop-in-windows" target="_blank">here</a> or maybe <a href="https://github.com/docker/for-win/issues/13075" target="_blank">here</a>. In any case, I took a different approach.</p>

<h1 id="install-linux-subsystem">Install Linux Subsystem</h1>

<p>The first step was getting a Linux subsystem installed on Windows. I mostly followed the steps <a href="https://learn.microsoft.com/en-us/windows/wsl/install-manual" target="_blank">here</a>. But I had some diversions due to issues. In the end my steps were as follows:</p>

<p>Open a Windows PowerShell as an admin and run</p>

<div class="language-plaintext highlighter-rouge"><div class="highlight"><pre class="highlight"><code>dism.exe /online /enable-feature /featurename:Microsoft-Windows-Subsystem-Linux /all /norestart
</code></pre></div></div>

<p>to enable the WSL subsystem feature.</p>

<p>Then run</p>

<div class="language-plaintext highlighter-rouge"><div class="highlight"><pre class="highlight"><code>dism.exe /online /enable-feature /featurename:VirtualMachinePlatform /all /norestart
</code></pre></div></div>

<p>to enable the virtual machine feature.</p>

<p>I then needed to download and run the WSL2 (version 2!) kernel updater shown in step 4 at the <a href="https://learn.microsoft.com/en-us/windows/wsl/install-manual#step-4---download-the-linux-kernel-update-package" target="_blank">link above</a>.</p>

<p>After that update, back in the admin PowerShell, I ran:</p>

<div class="language-plaintext highlighter-rouge"><div class="highlight"><pre class="highlight"><code>wsl.exe --set-default-version 2
</code></pre></div></div>

<p>(Note: in many cases I had to add an <code class="language-plaintext highlighter-rouge">.exe</code> to my commands, because e.g., <code class="language-plaintext highlighter-rouge">wsl &lt;some command&gt;</code> was not working.)</p>

<p>On the Microsoft store, I installed Ubuntu-20.04.2 LTS. Now I can open an Ubuntu shell on my machine!</p>

<h2 id="aside-getting-ubuntu-shell-looking-nice">Aside: Getting Ubuntu Shell Looking Nice</h2>

<p>I added to my <code class="language-plaintext highlighter-rouge">.bashrc</code> (found in the Ubuntu home directory <code class="language-plaintext highlighter-rouge">~/.bashrc</code>) the following:</p>

<div class="language-plaintext highlighter-rouge"><div class="highlight"><pre class="highlight"><code>parse_git_branch() {
 git branch 2&gt; /dev/null | sed -e '/^[^*]/d' -e 's/* \(.*\)/(\1)/'
}
if [ "$color_prompt" = yes ]; then
 PS1='${debian_chroot:+($debian_chroot)}\[\033[01;32m\]\u@\h\[\033[00m\]:\[\033[01;34m\]\w\[\033[01;31m\] $(parse_git_branch)\[\033[00m\]\$ '
else
 PS1='${debian_chroot:+($debian_chroot)}\u@\h:\w$(parse_git_branch)\$ '
fi

# THE SIX LINES BELOW are the default prompt and the unset (which were in the original .bashrc)
#if [ "$color_prompt" = yes ]; then
#    PS1='${debian_chroot:+($debian_chroot)}\[\033[01;32m\]\u@\h\[\033[00m\]:\[\033[01;34m\]\w\[\033[00m\]\$ '
#else
#    PS1='${debian_chroot:+($debian_chroot)}\u@\h:\w\$ '
#fi
#unset color_prompt force_color_prompt
</code></pre></div></div>

<p>Basically, I commented out the default behavior and added the git branch parser so I can see what git branch I am on in the shell (if I’m in a repo folder).</p>

<p>There’s a lot more you can do in the <code class="language-plaintext highlighter-rouge">~/.bashrc</code> file to customize your shell. Like you can set what commands are run when the shell opens, because this file is run everytime you open a new shell.</p>

<h1 id="setting-up-ruby-on-rails">Setting up Ruby on Rails</h1>

<p>Now that I have a Linux virtual machine on my PC, I followed <a href="https://gorails.com/setup/windows/10#ruby" target="_blank">these steps</a> to get Ruby on Rails running. There were again some diversions due to errors, but the general steps (and commands) were:</p>

<h2 id="ruby">Ruby</h2>

<p>In the Ubuntu WSL shell, run:</p>

<div class="language-plaintext highlighter-rouge"><div class="highlight"><pre class="highlight"><code>sudo apt-get update
sudo apt-get install git-core curl zlib1g-dev build-essential libssl-dev libreadline-dev libyaml-dev libsqlite3-dev sqlite3 libxml2-dev libxslt1-dev libcurl4-openssl-dev software-properties-common libffi-dev
</code></pre></div></div>

<p>These are some dependencies. Once that’s done we need a Ruby version manager called <code class="language-plaintext highlighter-rouge">rbenv</code>. That is installed with these commands:</p>

<div class="language-plaintext highlighter-rouge"><div class="highlight"><pre class="highlight"><code>cd
git clone https://github.com/rbenv/rbenv.git ~/.rbenv
echo 'export PATH="$HOME/.rbenv/bin:$PATH"' &gt;&gt; ~/.bashrc
echo 'eval "$(rbenv init -)"' &gt;&gt; ~/.bashrc
exec $SHELL

git clone https://github.com/rbenv/ruby-build.git ~/.rbenv/plugins/ruby-build
echo 'export PATH="$HOME/.rbenv/plugins/ruby-build/bin:$PATH"' &gt;&gt; ~/.bashrc
exec $SHELL
</code></pre></div></div>

<p>(Note the <code class="language-plaintext highlighter-rouge">echo ...</code> commands send some copy into the <code class="language-plaintext highlighter-rouge">/.bashrc</code> via the <code class="language-plaintext highlighter-rouge">&gt;&gt;</code> shovel operator. Now this code will be run whenever the shell opens or whenever we run <code class="language-plaintext highlighter-rouge">exec $SHELL</code>.)</p>

<p>We now want to install Ruby with the manager. For my current project, I needed version 3.1.2, so I installed that at the Ubuntu shell with:</p>

<div class="language-plaintext highlighter-rouge"><div class="highlight"><pre class="highlight"><code>rbenv install 3.1.2
</code></pre></div></div>

<p>Then set it to be the global Ruby version for the shell with:</p>

<div class="language-plaintext highlighter-rouge"><div class="highlight"><pre class="highlight"><code>rbenv global 3.1.2
</code></pre></div></div>

<p>Now whenever I want to install or switch versions in a shell I can just do</p>

<div class="language-plaintext highlighter-rouge"><div class="highlight"><pre class="highlight"><code>rbenv install &lt;version&gt;
rbenv global &lt;version&gt;
</code></pre></div></div>

<p>And confirm the version with</p>

<div class="language-plaintext highlighter-rouge"><div class="highlight"><pre class="highlight"><code>ruby -v
</code></pre></div></div>

<p>We also need the all-important <a href="https://bundler.io/" target="_blank">bundler</a> gem, which is a Ruby environment manager (kinda like <code class="language-plaintext highlighter-rouge">conda</code> for python?). In the Ubuntu shell I ran:</p>

<div class="language-plaintext highlighter-rouge"><div class="highlight"><pre class="highlight"><code>gem install bundler
rbenv rehash
</code></pre></div></div>

<h2 id="git">Git</h2>

<p>At the Ubuntu shell I ran:</p>

<div class="language-plaintext highlighter-rouge"><div class="highlight"><pre class="highlight"><code>git config --global color.ui true
git config --global user.name "YOUR NAME"
git config --global user.email "YOUR@EMAIL.com"
ssh-keygen -t rsa -b 4096 -C "YOUR@EMAIL.com"
</code></pre></div></div>

<p>The first three commands are just for setting some colors and my username on Github “Ben Purinton” and email. The last <code class="language-plaintext highlighter-rouge">ssh-keygen</code> command generates a public/private SSH key. The last command asks for a location (I used the default <code class="language-plaintext highlighter-rouge">~/.ssh/id_rsa.pub</code>) and password ([redacted]).</p>

<p>I put the public key on my Github profile by pasting the output of:</p>

<div class="language-plaintext highlighter-rouge"><div class="highlight"><pre class="highlight"><code>cat ~/.ssh/id_rsa.pub
</code></pre></div></div>

<p>to the relevant area of my Github account (“Settings” &gt; “SSH”).</p>

<p>Now I don’t need to go and enter my Github password all the time! I can check it’s working by running <code class="language-plaintext highlighter-rouge">ssh -T git@github.com</code>, which gives back some “you’re connected” copy.</p>

<h2 id="rails">Rails</h2>

<p>To install Rails, at the Ubuntu shell I ran:</p>

<div class="language-plaintext highlighter-rouge"><div class="highlight"><pre class="highlight"><code>curl -sL https://deb.nodesource.com/setup_12.x | sudo -E bash -
curl -sS https://dl.yarnpkg.com/debian/pubkey.gpg | sudo apt-key add -
echo "deb https://dl.yarnpkg.com/debian/ stable main" | sudo tee /etc/apt/sources.list.d/yarn.list

sudo apt update
sudo apt-get install -y nodejs yarn
</code></pre></div></div>

<p>These are to cover dependencies for Rails. NodeJS is a Javascript runtime and Yarn is a package manager.</p>

<p>Now I can install Rails (which is just a gem!) by running:</p>

<div class="language-plaintext highlighter-rouge"><div class="highlight"><pre class="highlight"><code>gem install rails -v 7.0.4
</code></pre></div></div>

<p>The version can of course be changed, but I just used the latest version (7.0.4).</p>

<p>I also need to rehash via:</p>

<div class="language-plaintext highlighter-rouge"><div class="highlight"><pre class="highlight"><code>rbenv rehash
</code></pre></div></div>

<p>And confirm the install via:</p>

<div class="language-plaintext highlighter-rouge"><div class="highlight"><pre class="highlight"><code>rails -v
</code></pre></div></div>

<h2 id="postgresql">PostgreSQL</h2>

<p>Now came the really annoying part. I’ll spare all the gory details, but here’s what worked for <em>me</em>. I began with the steps <a href="https://kdshah6593.medium.com/installing-postgresql-with-windows-subsystem-linux-wsl2-4adfa524f86d" target="_blank">here</a>, but did NOT create a new user. My commands were:</p>

<div class="language-plaintext highlighter-rouge"><div class="highlight"><pre class="highlight"><code>sudo apt-get remove postgresql
</code></pre></div></div>

<p>To remove any previously installed package. (Note: <a href="https://askubuntu.com/questions/1010442/how-to-uninstall-the-postgresql" target="_blank">if you really want to purge</a> postgresql then you need to run <code class="language-plaintext highlighter-rouge">sudo apt-get --purge remove postgresql*</code>).</p>

<p>Then I installed the database and its dependencies with:</p>

<div class="language-plaintext highlighter-rouge"><div class="highlight"><pre class="highlight"><code>sudo apt install postgresql postgresql-contrib libpq-dev
</code></pre></div></div>

<p>Now it should work! You just need to type:</p>

<div class="language-plaintext highlighter-rouge"><div class="highlight"><pre class="highlight"><code>sudo service postgresql start
</code></pre></div></div>

<p>To start the database. You can stop it by changing <code class="language-plaintext highlighter-rouge">start</code> to <code class="language-plaintext highlighter-rouge">stop</code></p>

<p>You can also start a database with <code class="language-plaintext highlighter-rouge">sudo pg_createcluster 14 main</code> (changing <code class="language-plaintext highlighter-rouge">14</code>) to whatever version you have installed, which you can check by doing an <code class="language-plaintext highlighter-rouge">ls /etc/postgresql</code> where you should see a folder with the version number. Actually, in that folder you will find the named databases (e.g., <code class="language-plaintext highlighter-rouge">main</code>). Oh and while I’m at it with these run on thoughts, when things are really messed up you can also drop a database wtih <code class="language-plaintext highlighter-rouge">pg_dropcluster</code>… Oh, and by the way, the database seems to exist at both <code class="language-plaintext highlighter-rouge">/etc/postgresql/14/main/</code> AND <code class="language-plaintext highlighter-rouge">/var/lib/postgresql/14/main/</code>, go figure… TLDR; follow the steps / commands above and below and hopefully you don’t need to worry about all these asides.</p>

<p>Everytime we start a shell, we need to run:</p>

<div class="language-plaintext highlighter-rouge"><div class="highlight"><pre class="highlight"><code>sudo service postgresql start
</code></pre></div></div>

<p>But if you forget, when you go and start your Rails app, you’ll immediatelly get an error connecting to ActiveRecord, so that’ll be your reminder to start the database. You could also add the command to <code class="language-plaintext highlighter-rouge">~/.bashrc</code>.</p>

<h3 id="how-to-fix-postgres-user-error">How to fix <code class="language-plaintext highlighter-rouge">postgres</code> user error</h3>

<p>Thought I was done? Me too! Nope! When I tried to <code class="language-plaintext highlighter-rouge">bin/setup</code> or <code class="language-plaintext highlighter-rouge">rails server</code> in my Rails app that I wanted to work on, I got the error:</p>

<div class="language-plaintext highlighter-rouge"><div class="highlight"><pre class="highlight"><code>ActiveRecord::DatabaseConnectionError: There is an issue connecting to your database with you username/password, username: postgres.
</code></pre></div></div>

<p>When you install postgres I guess it generates a superuser named <code class="language-plaintext highlighter-rouge">postgres</code> that has full control over databases you create. But the Rails app I was working in said there was some error with this profile / password combo (that I had no part in setting up…)</p>

<p>Luckily, a colleague pointed me towards <a href="https://gabrielinnocentrockerfeller.medium.com/how-to-fix-fatal-password-authentication-failed-for-user-postgres-in-ubuntu-20-4-f7c6d2856fc9" target="_blank">this post</a>, which I summarize:</p>

<p>Running (<code class="language-plaintext highlighter-rouge">psql</code> is a terminal-based front-end to PostgreSQL):</p>

<div class="language-plaintext highlighter-rouge"><div class="highlight"><pre class="highlight"><code>psql -U postgres
</code></pre></div></div>

<p>Gave me the error message:</p>

<div class="language-plaintext highlighter-rouge"><div class="highlight"><pre class="highlight"><code>psql: error: FATAL: Peer authentication failed for user "postgres"
</code></pre></div></div>

<p>Uh-oh! I need to configure a password!</p>

<p>First I ran:</p>

<div class="language-plaintext highlighter-rouge"><div class="highlight"><pre class="highlight"><code>sudo -i -u postgres
</code></pre></div></div>

<p>That opened a sub-shell <em>as</em> the postgres user (as opposed to the username I used to setup my Ubuntu subsystem: <code class="language-plaintext highlighter-rouge">bpurinton</code>). Now at this new sub-shell prompot I ran:</p>

<div class="language-plaintext highlighter-rouge"><div class="highlight"><pre class="highlight"><code>psql
</code></pre></div></div>

<p>which opens the PostgreSQL <em>terminal</em>, where the prompt starts with <code class="language-plaintext highlighter-rouge">postgres=#</code> and you enter commands after that <code class="language-plaintext highlighter-rouge">#</code>. Now I ran:</p>

<div class="language-plaintext highlighter-rouge"><div class="highlight"><pre class="highlight"><code>ALTER USER postgres PASSWORD 'postgres';
</code></pre></div></div>

<p>To give the postgres superuser a password (in quotation marks)! The above returns <code class="language-plaintext highlighter-rouge">ALTER ROLE</code>. Great, thanks for letting me know. Now I can exit the postgres terminal by typing <code class="language-plaintext highlighter-rouge">\q</code> at the <code class="language-plaintext highlighter-rouge">#</code> prompt, then exit the postgres user subshell by typing <code class="language-plaintext highlighter-rouge">exit</code>, and wind up back at my standard Ubuntu shell.</p>

<p>Another step! I need to alter the <code class="language-plaintext highlighter-rouge">pg_hba.config</code> file to allow access. Using an editor (I just did it with nano):</p>

<div class="language-plaintext highlighter-rouge"><div class="highlight"><pre class="highlight"><code>sudo nano /etc/postgresql/14/main/pg_hba.conf
</code></pre></div></div>

<p><code class="language-plaintext highlighter-rouge">14</code> and <code class="language-plaintext highlighter-rouge">main</code> would need to be changed if you have a different postgres version or cluster name. Basically, the file says, somewhere near the bottom this:</p>

<p><img src="/assets/images/pg_hba.conf.before.png" alt="" /></p>

<p>And I needed to change all the <code class="language-plaintext highlighter-rouge">peer</code> keywords to something like <code class="language-plaintext highlighter-rouge">scram-sha-256</code>, like so:</p>

<p><img src="/assets/images/pg_hba.conf.after.png" alt="" /></p>

<p>Now, with the file changed and saved, back at the Ubuntu shell I run:</p>

<div class="language-plaintext highlighter-rouge"><div class="highlight"><pre class="highlight"><code>sudo service postgresql restart
</code></pre></div></div>

<p>then:</p>

<div class="language-plaintext highlighter-rouge"><div class="highlight"><pre class="highlight"><code>psql -U postgres
</code></pre></div></div>

<p>and I don’t get any errors and now I’m good to go! <code class="language-plaintext highlighter-rouge">bin/setup</code> and <code class="language-plaintext highlighter-rouge">rails server</code> work. Finally!</p>]]></content><author><name>Ben Purinton</name></author><category term="postgresql" /><category term="ruby" /><category term="rails" /><category term="wsl" /><summary type="html"><![CDATA[I just spent a long time getting my Windows machine setup with Ruby on Rails and the PostgreSQL database in order to work on some software development. Here are the steps I followed. Docker + Ruby on Rails Ideally, I could have set things up as a docker container, with the steps here, but that didn’t work at all. I had a lot of issues with docker on my machine, which may have come down to my own misunderstanding, or may have had to do with some similar bugs reported here or here or maybe here. In any case, I took a different approach. Install Linux Subsystem The first step was getting a Linux subsystem installed on Windows. I mostly followed the steps here. But I had some diversions due to issues. In the end my steps were as follows: Open a Windows PowerShell as an admin and run dism.exe /online /enable-feature /featurename:Microsoft-Windows-Subsystem-Linux /all /norestart to enable the WSL subsystem feature. Then run dism.exe /online /enable-feature /featurename:VirtualMachinePlatform /all /norestart to enable the virtual machine feature. I then needed to download and run the WSL2 (version 2!) kernel updater shown in step 4 at the link above. After that update, back in the admin PowerShell, I ran: wsl.exe --set-default-version 2 (Note: in many cases I had to add an .exe to my commands, because e.g., wsl &lt;some command&gt; was not working.) On the Microsoft store, I installed Ubuntu-20.04.2 LTS. Now I can open an Ubuntu shell on my machine! Aside: Getting Ubuntu Shell Looking Nice I added to my .bashrc (found in the Ubuntu home directory ~/.bashrc) the following: parse_git_branch() { git branch 2&gt; /dev/null | sed -e '/^[^*]/d' -e 's/* \(.*\)/(\1)/' } if [ "$color_prompt" = yes ]; then PS1='${debian_chroot:+($debian_chroot)}\[\033[01;32m\]\u@\h\[\033[00m\]:\[\033[01;34m\]\w\[\033[01;31m\] $(parse_git_branch)\[\033[00m\]\$ ' else PS1='${debian_chroot:+($debian_chroot)}\u@\h:\w$(parse_git_branch)\$ ' fi # THE SIX LINES BELOW are the default prompt and the unset (which were in the original .bashrc) #if [ "$color_prompt" = yes ]; then # PS1='${debian_chroot:+($debian_chroot)}\[\033[01;32m\]\u@\h\[\033[00m\]:\[\033[01;34m\]\w\[\033[00m\]\$ ' #else # PS1='${debian_chroot:+($debian_chroot)}\u@\h:\w\$ ' #fi #unset color_prompt force_color_prompt Basically, I commented out the default behavior and added the git branch parser so I can see what git branch I am on in the shell (if I’m in a repo folder). There’s a lot more you can do in the ~/.bashrc file to customize your shell. Like you can set what commands are run when the shell opens, because this file is run everytime you open a new shell. Setting up Ruby on Rails Now that I have a Linux virtual machine on my PC, I followed these steps to get Ruby on Rails running. There were again some diversions due to errors, but the general steps (and commands) were: Ruby In the Ubuntu WSL shell, run: sudo apt-get update sudo apt-get install git-core curl zlib1g-dev build-essential libssl-dev libreadline-dev libyaml-dev libsqlite3-dev sqlite3 libxml2-dev libxslt1-dev libcurl4-openssl-dev software-properties-common libffi-dev These are some dependencies. Once that’s done we need a Ruby version manager called rbenv. That is installed with these commands: cd git clone https://github.com/rbenv/rbenv.git ~/.rbenv echo 'export PATH="$HOME/.rbenv/bin:$PATH"' &gt;&gt; ~/.bashrc echo 'eval "$(rbenv init -)"' &gt;&gt; ~/.bashrc exec $SHELL git clone https://github.com/rbenv/ruby-build.git ~/.rbenv/plugins/ruby-build echo 'export PATH="$HOME/.rbenv/plugins/ruby-build/bin:$PATH"' &gt;&gt; ~/.bashrc exec $SHELL (Note the echo ... commands send some copy into the /.bashrc via the &gt;&gt; shovel operator. Now this code will be run whenever the shell opens or whenever we run exec $SHELL.) We now want to install Ruby with the manager. For my current project, I needed version 3.1.2, so I installed that at the Ubuntu shell with: rbenv install 3.1.2 Then set it to be the global Ruby version for the shell with: rbenv global 3.1.2 Now whenever I want to install or switch versions in a shell I can just do rbenv install &lt;version&gt; rbenv global &lt;version&gt; And confirm the version with ruby -v We also need the all-important bundler gem, which is a Ruby environment manager (kinda like conda for python?). In the Ubuntu shell I ran: gem install bundler rbenv rehash Git At the Ubuntu shell I ran: git config --global color.ui true git config --global user.name "YOUR NAME" git config --global user.email "YOUR@EMAIL.com" ssh-keygen -t rsa -b 4096 -C "YOUR@EMAIL.com" The first three commands are just for setting some colors and my username on Github “Ben Purinton” and email. The last ssh-keygen command generates a public/private SSH key. The last command asks for a location (I used the default ~/.ssh/id_rsa.pub) and password ([redacted]). I put the public key on my Github profile by pasting the output of: cat ~/.ssh/id_rsa.pub to the relevant area of my Github account (“Settings” &gt; “SSH”). Now I don’t need to go and enter my Github password all the time! I can check it’s working by running ssh -T git@github.com, which gives back some “you’re connected” copy. Rails To install Rails, at the Ubuntu shell I ran: curl -sL https://deb.nodesource.com/setup_12.x | sudo -E bash - curl -sS https://dl.yarnpkg.com/debian/pubkey.gpg | sudo apt-key add - echo "deb https://dl.yarnpkg.com/debian/ stable main" | sudo tee /etc/apt/sources.list.d/yarn.list sudo apt update sudo apt-get install -y nodejs yarn These are to cover dependencies for Rails. NodeJS is a Javascript runtime and Yarn is a package manager. Now I can install Rails (which is just a gem!) by running: gem install rails -v 7.0.4 The version can of course be changed, but I just used the latest version (7.0.4). I also need to rehash via: rbenv rehash And confirm the install via: rails -v PostgreSQL Now came the really annoying part. I’ll spare all the gory details, but here’s what worked for me. I began with the steps here, but did NOT create a new user. My commands were: sudo apt-get remove postgresql To remove any previously installed package. (Note: if you really want to purge postgresql then you need to run sudo apt-get --purge remove postgresql*). Then I installed the database and its dependencies with: sudo apt install postgresql postgresql-contrib libpq-dev Now it should work! You just need to type: sudo service postgresql start To start the database. You can stop it by changing start to stop You can also start a database with sudo pg_createcluster 14 main (changing 14) to whatever version you have installed, which you can check by doing an ls /etc/postgresql where you should see a folder with the version number. Actually, in that folder you will find the named databases (e.g., main). Oh and while I’m at it with these run on thoughts, when things are really messed up you can also drop a database wtih pg_dropcluster… Oh, and by the way, the database seems to exist at both /etc/postgresql/14/main/ AND /var/lib/postgresql/14/main/, go figure… TLDR; follow the steps / commands above and below and hopefully you don’t need to worry about all these asides. Everytime we start a shell, we need to run: sudo service postgresql start But if you forget, when you go and start your Rails app, you’ll immediatelly get an error connecting to ActiveRecord, so that’ll be your reminder to start the database. You could also add the command to ~/.bashrc. How to fix postgres user error Thought I was done? Me too! Nope! When I tried to bin/setup or rails server in my Rails app that I wanted to work on, I got the error: ActiveRecord::DatabaseConnectionError: There is an issue connecting to your database with you username/password, username: postgres. When you install postgres I guess it generates a superuser named postgres that has full control over databases you create. But the Rails app I was working in said there was some error with this profile / password combo (that I had no part in setting up…) Luckily, a colleague pointed me towards this post, which I summarize: Running (psql is a terminal-based front-end to PostgreSQL): psql -U postgres Gave me the error message: psql: error: FATAL: Peer authentication failed for user "postgres" Uh-oh! I need to configure a password! First I ran: sudo -i -u postgres That opened a sub-shell as the postgres user (as opposed to the username I used to setup my Ubuntu subsystem: bpurinton). Now at this new sub-shell prompot I ran: psql which opens the PostgreSQL terminal, where the prompt starts with postgres=# and you enter commands after that #. Now I ran: ALTER USER postgres PASSWORD 'postgres'; To give the postgres superuser a password (in quotation marks)! The above returns ALTER ROLE. Great, thanks for letting me know. Now I can exit the postgres terminal by typing \q at the # prompt, then exit the postgres user subshell by typing exit, and wind up back at my standard Ubuntu shell. Another step! I need to alter the pg_hba.config file to allow access. Using an editor (I just did it with nano): sudo nano /etc/postgresql/14/main/pg_hba.conf 14 and main would need to be changed if you have a different postgres version or cluster name. Basically, the file says, somewhere near the bottom this: And I needed to change all the peer keywords to something like scram-sha-256, like so: Now, with the file changed and saved, back at the Ubuntu shell I run: sudo service postgresql restart then: psql -U postgres and I don’t get any errors and now I’m good to go! bin/setup and rails server work. Finally!]]></summary></entry><entry><title type="html">Custom JavaScript in Bookdown</title><link href="https://bendirt.com/javascript-in-bookdown/" rel="alternate" type="text/html" title="Custom JavaScript in Bookdown" /><published>2023-02-07T00:00:00+00:00</published><updated>2023-02-07T00:00:00+00:00</updated><id>https://bendirt.com/javascript-in-bookdown</id><content type="html" xml:base="https://bendirt.com/javascript-in-bookdown/"><![CDATA[<p>I wanted some custom behavior in my bookdown project. Specifically, I wanted all the internal cross references to open in new tabs so that the reading flow is unbroken.</p>

<h1 id="the-issue">The Issue</h1>

<p>With <em>external</em> references, bookdown’s formatting makes it easy to write:</p>

<div class="language-markdown highlighter-rouge"><div class="highlight"><pre class="highlight"><code><span class="p">[</span><span class="nv">some website</span><span class="p">](</span><span class="sx">theURL</span><span class="p">)</span>{target="_blank"}
</code></pre></div></div>

<p>which parses to</p>

<div class="language-html highlighter-rouge"><div class="highlight"><pre class="highlight"><code><span class="nt">&lt;a</span> <span class="na">href=</span><span class="s">"theURL"</span> <span class="na">target=</span><span class="s">"_blank"</span><span class="nt">&gt;</span>some website<span class="nt">&lt;/a&gt;</span>
</code></pre></div></div>

<p>But the bookdown <em>internal</em> cross-reference works like:</p>

<div class="language-markdown highlighter-rouge"><div class="highlight"><pre class="highlight"><code><span class="p">[</span><span class="nv">some cross reference</span><span class="p">][</span><span class="ss">the section ID</span><span class="p">]</span>
</code></pre></div></div>

<p>This doesn’t accept the additional <code class="language-plaintext highlighter-rouge">{target="_blank"}</code>. So how to fix this?</p>

<h1 id="javascript-to-the-rescue">JavaScript to the Rescue</h1>

<p>JavaScript <code class="language-plaintext highlighter-rouge">&lt;script&gt;</code>s in the HTML document allow you to modify the HTML after bookdown (well, pandoc actually) finishes rendering the output into HTML static files. My understanding is that this re-rendering and HTML addition is actually carried out by the browser when it encounters the <code class="language-plaintext highlighter-rouge">&lt;script&gt;&lt;/script&gt;</code> tags in an HTML document.</p>

<p>First, I found <a href="https://stackoverflow.com/questions/6822945/add-target-blank-to-link-with-javascript" target="_blank">this post</a>, and the first answer there (<a href="https://stackoverflow.com/a/6823034" target="_blank">this one</a>) told me that I could use a very simple JS script to retroactively add all my nice <code class="language-plaintext highlighter-rouge">target="_blank"</code>s:</p>

<div class="language-js highlighter-rouge"><div class="highlight"><pre class="highlight"><code><span class="kd">var</span> <span class="nx">links</span> <span class="o">=</span> <span class="nb">document</span><span class="p">.</span><span class="nx">getElementsByTagName</span><span class="p">(</span><span class="dl">'</span><span class="s1">a</span><span class="dl">'</span><span class="p">);</span>
<span class="kd">var</span> <span class="nx">len</span> <span class="o">=</span> <span class="nx">links</span><span class="p">.</span><span class="nx">length</span><span class="p">;</span>

<span class="k">for</span><span class="p">(</span><span class="kd">var</span> <span class="nx">i</span><span class="o">=</span><span class="mi">0</span><span class="p">;</span> <span class="nx">i</span><span class="o">&lt;</span><span class="nx">len</span><span class="p">;</span> <span class="nx">i</span><span class="o">++</span><span class="p">)</span>
<span class="p">{</span>
   <span class="nx">links</span><span class="p">[</span><span class="nx">i</span><span class="p">].</span><span class="nx">target</span> <span class="o">=</span> <span class="dl">"</span><span class="s2">_blank</span><span class="dl">"</span><span class="p">;</span>
<span class="p">}</span>
</code></pre></div></div>

<p>This script gets all the <code class="language-plaintext highlighter-rouge">&lt;a&gt;&lt;/a&gt;</code> link tags, and adds the code iteratively in a loop. If the link already had a <code class="language-plaintext highlighter-rouge">target="_blank"</code> tag, it just overwrites it. Probably it would be “more correct” to ignore those that already have the tag, but it ain’t broke so I ain’t fixin it.</p>

<h2 id="how-do-i-get-this-thing-to-run">How do I get this thing to run?</h2>

<p>I’m fairly new to JS, but luckily I found <a href="https://community.rstudio.com/t/insertion-of-javascript-into-bookdown-project/44176" target="_blank">this post</a> regarding JS and bookdown. Unfortunately the person was not answered, but their code told me I just needed to do three things in my bookdown project.</p>

<p>First, I needed to make a new file in the <code class="language-plaintext highlighter-rouge">assets/styling/</code> folder called <code class="language-plaintext highlighter-rouge">scripts.html</code>. I could put this file anywhere and call it anything, but I consider what I’m doing here “styling”. Now any other JS scripts I want in my project can go into <code class="language-plaintext highlighter-rouge">assets/styling/scripts.html</code>.</p>

<p>Second, I just need to drop the above JS script into the new file with some HTML tags:</p>

<div class="language-html highlighter-rouge"><div class="highlight"><pre class="highlight"><code><span class="nt">&lt;script&gt;</span>
  <span class="kd">var</span> <span class="nx">links</span> <span class="o">=</span> <span class="nb">document</span><span class="p">.</span><span class="nx">getElementsByTagName</span><span class="p">(</span><span class="dl">'</span><span class="s1">a</span><span class="dl">'</span><span class="p">);</span>
  <span class="kd">var</span> <span class="nx">len</span> <span class="o">=</span> <span class="nx">links</span><span class="p">.</span><span class="nx">length</span><span class="p">;</span>

  <span class="k">for</span><span class="p">(</span><span class="kd">var</span> <span class="nx">i</span><span class="o">=</span><span class="mi">0</span><span class="p">;</span> <span class="nx">i</span><span class="o">&lt;</span><span class="nx">len</span><span class="p">;</span> <span class="nx">i</span><span class="o">++</span><span class="p">)</span>
  <span class="p">{</span>
    <span class="nx">links</span><span class="p">[</span><span class="nx">i</span><span class="p">].</span><span class="nx">target</span> <span class="o">=</span> <span class="dl">"</span><span class="s2">_blank</span><span class="dl">"</span><span class="p">;</span>
  <span class="p">}</span>
<span class="nt">&lt;/script&gt;</span>
</code></pre></div></div>

<p>Lastly, I need to point the file out to bookdown, so that it will add the script to each HTML file, which will then later be interpreted by the browser. I just need to add the following to the <code class="language-plaintext highlighter-rouge">_output.yml</code> file associated with my bookdown project:</p>

<div class="language-yml highlighter-rouge"><div class="highlight"><pre class="highlight"><code><span class="s">bookdown::gitbook:</span>
  <span class="s">css</span><span class="err">:</span> <span class="s">assets/styling/style.css</span>
  <span class="s">pandoc_args</span><span class="err">:</span> <span class="pi">[</span><span class="s2">"</span><span class="s">--lua-filter=assets/styling/footnote.lua"</span><span class="pi">]</span>
  <span class="na">includes</span><span class="pi">:</span>
    <span class="na">in_header</span><span class="pi">:</span> <span class="s">assets/styling/style.html</span>
    <span class="na">after_body</span><span class="pi">:</span> <span class="s">assets/styling/scripts.html</span>
  <span class="c1"># ...</span>
</code></pre></div></div>

<p>Now the project includes my custom script added to every HTML page.</p>]]></content><author><name>Ben Purinton</name></author><category term="bookdown" /><category term="markdown" /><category term="html" /><category term="javascript" /><summary type="html"><![CDATA[I wanted some custom behavior in my bookdown project. Specifically, I wanted all the internal cross references to open in new tabs so that the reading flow is unbroken. The Issue With external references, bookdown’s formatting makes it easy to write: [some website](theURL){target="_blank"} which parses to &lt;a href="theURL" target="_blank"&gt;some website&lt;/a&gt; But the bookdown internal cross-reference works like: [some cross reference][the section ID] This doesn’t accept the additional {target="_blank"}. So how to fix this? JavaScript to the Rescue JavaScript &lt;script&gt;s in the HTML document allow you to modify the HTML after bookdown (well, pandoc actually) finishes rendering the output into HTML static files. My understanding is that this re-rendering and HTML addition is actually carried out by the browser when it encounters the &lt;script&gt;&lt;/script&gt; tags in an HTML document. First, I found this post, and the first answer there (this one) told me that I could use a very simple JS script to retroactively add all my nice target="_blank"s: var links = document.getElementsByTagName('a'); var len = links.length; for(var i=0; i&lt;len; i++) { links[i].target = "_blank"; } This script gets all the &lt;a&gt;&lt;/a&gt; link tags, and adds the code iteratively in a loop. If the link already had a target="_blank" tag, it just overwrites it. Probably it would be “more correct” to ignore those that already have the tag, but it ain’t broke so I ain’t fixin it. How do I get this thing to run? I’m fairly new to JS, but luckily I found this post regarding JS and bookdown. Unfortunately the person was not answered, but their code told me I just needed to do three things in my bookdown project. First, I needed to make a new file in the assets/styling/ folder called scripts.html. I could put this file anywhere and call it anything, but I consider what I’m doing here “styling”. Now any other JS scripts I want in my project can go into assets/styling/scripts.html. Second, I just need to drop the above JS script into the new file with some HTML tags: &lt;script&gt; var links = document.getElementsByTagName('a'); var len = links.length; for(var i=0; i&lt;len; i++) { links[i].target = "_blank"; } &lt;/script&gt; Lastly, I need to point the file out to bookdown, so that it will add the script to each HTML file, which will then later be interpreted by the browser. I just need to add the following to the _output.yml file associated with my bookdown project: bookdown::gitbook: css: assets/styling/style.css pandoc_args: ["--lua-filter=assets/styling/footnote.lua"] includes: in_header: assets/styling/style.html after_body: assets/styling/scripts.html # ... Now the project includes my custom script added to every HTML page.]]></summary></entry><entry><title type="html">Writing a textbook with bookdown</title><link href="https://bendirt.com/bookdown/" rel="alternate" type="text/html" title="Writing a textbook with bookdown" /><published>2023-01-11T00:00:00+00:00</published><updated>2023-01-11T00:00:00+00:00</updated><id>https://bendirt.com/bookdown</id><content type="html" xml:base="https://bendirt.com/bookdown/"><![CDATA[<p>I am working on an outline for a textbook for a fullstack programming course. I want to break my outline into lessons and generate a nice HTML view from the markdown files that will become the basis for an interactive textbook. <a href="https://bookdown.org/" target="_blank">Bookdown</a> is the tool, documentation can be found <a href="https://bookdown.org/yihui/bookdown/introduction.html" target="_blank">here</a>. Here is how I set it up and got started.</p>

<h1 id="installing-r-with-vs-code">Installing R with VS Code</h1>

<p>Bookdown using the R programming langauge and markdown documents. So the first step is getting R running with the necessary packages. And I want it integrated in VSCode.</p>

<ol>
  <li>Install R: <a href="https://cloud.r-project.org/">https://cloud.r-project.org/</a> (make sure to check “Save version number in registry”)</li>
  <li>Install VSCode R editor support: <a href="https://marketplace.visualstudio.com/items?itemName=REditorSupport.r">https://marketplace.visualstudio.com/items?itemName=REditorSupport.r</a></li>
  <li>In R install <code class="language-plaintext highlighter-rouge">languageserver</code>: <a href="https://github.com/REditorSupport/languageserver">https://github.com/REditorSupport/languageserver</a>
    <ul>
      <li>open RGui on Windows</li>
      <li>run <code class="language-plaintext highlighter-rouge">install.packages("languageserver")</code></li>
      <li>also install <code class="language-plaintext highlighter-rouge">rmarkdown</code> with: <code class="language-plaintext highlighter-rouge">install.packages("rmarkdown")</code></li>
    </ul>
  </li>
  <li>Make sure R is on the system PATH, for me that was <code class="language-plaintext highlighter-rouge">C:\Program Files\R\R-4.2.2\bin</code></li>
  <li>Close and re-open VS Code if you cannot access R interactive shell from the command-line. There should also be a new terminal option “R Terminal” that opens an interactive shell.
    <ul>
      <li>can double check the packages installed with <code class="language-plaintext highlighter-rouge">install.packages("languageserver")</code> at the R Terminal, this shouldn’t do anything.</li>
    </ul>
  </li>
</ol>

<p>Once that was setup, I made a test R script <code class="language-plaintext highlighter-rouge">test.R</code>:</p>

<div class="language-r highlighter-rouge"><div class="highlight"><pre class="highlight"><code><span class="c1"># My first program in R Programming</span><span class="w">
</span><span class="n">myString</span><span class="w"> </span><span class="o">&lt;-</span><span class="w"> </span><span class="s2">"Hello, World!"</span><span class="w">

</span><span class="n">print</span><span class="w"> </span><span class="p">(</span><span class="n">myString</span><span class="p">)</span><span class="w">
</span></code></pre></div></div>

<p>And ran <code class="language-plaintext highlighter-rouge">R test.R</code> at the terminal. It worked. So R is up and running!</p>

<h1 id="first-steps-with-bookdown">First Steps with Bookdown</h1>

<p>To install bookdown for R, I just need to run (at the R terminal):</p>

<div class="language-r highlighter-rouge"><div class="highlight"><pre class="highlight"><code><span class="n">install.packages</span><span class="p">(</span><span class="s2">"bookdown"</span><span class="p">)</span><span class="w">
</span></code></pre></div></div>

<h2 id="minimal-example">Minimal Example</h2>

<p>Bookdown is built on <a href="https://rmarkdown.rstudio.com/lesson-1.html" target="_blank"><code class="language-plaintext highlighter-rouge">rmarkdown</code></a>. A demo for staring a project can be found <a href="https://github.com/rstudio/bookdown-demo" target="_blank">here</a>. However, I used the <a href="https://bookdown.org/yihui/bookdown/get-started.html" target="_blank">documentation</a> minimal example <a href="https://github.com/yihui/bookdown-minimal" target="_blank">here</a>.</p>

<h3 id="render_book"><code class="language-plaintext highlighter-rouge">render_book()</code></h3>

<p>I downloaded <code class="language-plaintext highlighter-rouge">index.Rmd</code>, then in the R terminal I ran:</p>

<div class="language-r highlighter-rouge"><div class="highlight"><pre class="highlight"><code><span class="n">bookdown</span><span class="o">::</span><span class="n">render_book</span><span class="p">(</span><span class="s1">'index.Rmd'</span><span class="p">,</span><span class="w"> </span><span class="s1">'all'</span><span class="p">)</span><span class="w">
</span></code></pre></div></div>

<p>This generated a folder <code class="language-plaintext highlighter-rouge">_book/</code> with a static HTML version of the content. This is the built book, and all arguments can be found in the <a href="https://bookdown.org/yihui/bookdown/build-the-book.html" target="_blank">documentation</a>:</p>

<div class="language-r highlighter-rouge"><div class="highlight"><pre class="highlight"><code><span class="n">bookdown</span><span class="o">::</span><span class="n">render_book</span><span class="p">(</span><span class="n">input</span><span class="w"> </span><span class="o">=</span><span class="w"> </span><span class="s2">"."</span><span class="p">,</span><span class="w"> </span><span class="n">output_format</span><span class="w"> </span><span class="o">=</span><span class="w"> </span><span class="kc">NULL</span><span class="p">,</span><span class="w"> </span><span class="n">...</span><span class="p">,</span><span class="w"> </span><span class="n">clean</span><span class="w"> </span><span class="o">=</span><span class="w"> </span><span class="kc">TRUE</span><span class="p">,</span><span class="w">
  </span><span class="n">envir</span><span class="w"> </span><span class="o">=</span><span class="w"> </span><span class="n">parent.frame</span><span class="p">(),</span><span class="w"> </span><span class="n">clean_envir</span><span class="w"> </span><span class="o">=</span><span class="w"> </span><span class="o">!</span><span class="nf">interactive</span><span class="p">(),</span><span class="w">
  </span><span class="n">output_dir</span><span class="w"> </span><span class="o">=</span><span class="w"> </span><span class="kc">NULL</span><span class="p">,</span><span class="w"> </span><span class="n">new_session</span><span class="w"> </span><span class="o">=</span><span class="w"> </span><span class="kc">NA</span><span class="p">,</span><span class="w"> </span><span class="n">preview</span><span class="w"> </span><span class="o">=</span><span class="w"> </span><span class="kc">FALSE</span><span class="p">,</span><span class="w">
  </span><span class="n">config_file</span><span class="w"> </span><span class="o">=</span><span class="w"> </span><span class="s2">"_bookdown.yml"</span><span class="p">)</span><span class="w">
</span></code></pre></div></div>

<p>By leaving <code class="language-plaintext highlighter-rouge">output_format</code> empty, the book is rendered as the first output format specified in the YAML metadata of the first <code class="language-plaintext highlighter-rouge">.Rmd</code> file or a separate YAML file <code class="language-plaintext highlighter-rouge">_output.yml</code> (see <a href="https://bookdown.org/yihui/bookdown/output-formats.html" target="_blank">here</a>). When you set <code class="language-plaintext highlighter-rouge">preview = TRUE</code>, only the Rmd files specified in the <code class="language-plaintext highlighter-rouge">input</code> argument are rendered, which can be convenient when previewing a certain chapter, since you do not recompile the whole book, but when publishing a book, this argument should certainly be set to <code class="language-plaintext highlighter-rouge">FALSE</code>.</p>

<h3 id="clean_book"><code class="language-plaintext highlighter-rouge">clean_book()</code></h3>

<p>You can delete the built book with:</p>

<div class="language-r highlighter-rouge"><div class="highlight"><pre class="highlight"><code><span class="n">bookdown</span><span class="o">::</span><span class="n">clean_book</span><span class="p">(</span><span class="kc">TRUE</span><span class="p">)</span><span class="w">
</span></code></pre></div></div>

<p>But be careful that things are version controlled with git so you don’t lose anything.</p>

<h3 id="viewing-the-book">Viewing the Book</h3>

<p>To view the static site in the <code class="language-plaintext highlighter-rouge">_book/</code> directory. I installed the VSCode extension <a href="https://marketplace.visualstudio.com/items?itemName=ms-vscode.live-server" target="_blank">Live Preview</a>. All I need to do is select one of the <code class="language-plaintext highlighter-rouge">.html</code> files, click the preview button in the code editor, and there it is. I can also just navigate to <code class="language-plaintext highlighter-rouge">http://127.0.0.1:3000/_book/</code> in my browser. It even updates as I add chapters and redo the <code class="language-plaintext highlighter-rouge">render_book()</code> command.</p>

<p>If the book is getting long and the pandoc conversion step of <code class="language-plaintext highlighter-rouge">render_book()</code> is taking awhile, then an individual chapter can be re-rendered using:</p>

<div class="language-r highlighter-rouge"><div class="highlight"><pre class="highlight"><code><span class="n">bookdown</span><span class="o">::</span><span class="n">preview_chapter</span><span class="p">(</span><span class="s2">"index.md"</span><span class="p">)</span><span class="w">
</span></code></pre></div></div>

<h2 id="practical-example">Practical Example</h2>

<h3 id="chapter-order">Chapter Order</h3>

<p>My default, bookdown will render files in the order of their name (e.g., <code class="language-plaintext highlighter-rouge">01-something.Rmd</code>, <code class="language-plaintext highlighter-rouge">02-something-else.Rmd</code>, etc.). I don’t want to provide an order in filenames, because I may want to remix and rematch. So I just need to override this behavior by making a <code class="language-plaintext highlighter-rouge">_bookdown.yml</code> file in the book directory and providing a file list:</p>

<div class="language-yaml highlighter-rouge"><div class="highlight"><pre class="highlight"><code><span class="na">rmd_files</span><span class="pi">:</span> <span class="pi">[</span><span class="s2">"</span><span class="s">02.Rmd"</span><span class="pi">,</span> <span class="s2">"</span><span class="s">01.Rmd"</span><span class="pi">,</span> <span class="s2">"</span><span class="s">index.Rmd"</span><span class="pi">]</span>
</code></pre></div></div>

<p>Filenames that start with an <code class="language-plaintext highlighter-rouge">_</code> underscore are skipped. The file <code class="language-plaintext highlighter-rouge">index.Rmd</code> will <em>always</em> be treated as the first even if re-ordered in the list.</p>

<p>I can create an appendix with <code class="language-plaintext highlighter-rouge"># (APPENDIX) Appendix {-}</code> at the top of a file, the <code class="language-plaintext highlighter-rouge">{-}</code> characters tell markdown not to give this a section number</p>

<h3 id="front-matter">Front Matter</h3>

<p>For now, I want the book to render as a <a href="https://bookdown.org/yihui/bookdown/html.html#gitbook-style" target="_blank">gitbook</a>, which provides nice links and a navigation pane. So the front-matter of the index file should look like so:</p>

<div class="language-r highlighter-rouge"><div class="highlight"><pre class="highlight"><code><span class="c1"># index.Rmd</span><span class="w">

</span><span class="o">---</span><span class="w">
</span><span class="n">title</span><span class="o">:</span><span class="w"> </span><span class="s2">"A Book"</span><span class="w">
</span><span class="n">author</span><span class="o">:</span><span class="w"> </span><span class="s2">"Ben"</span><span class="w">
</span><span class="n">site</span><span class="o">:</span><span class="w"> </span><span class="n">bookdown</span><span class="o">::</span><span class="n">bookdown_site</span><span class="w"> 
</span><span class="n">documentclass</span><span class="o">:</span><span class="w"> </span><span class="n">book</span><span class="w">
</span><span class="n">output</span><span class="o">:</span><span class="w">
  </span><span class="n">bookdown</span><span class="o">::</span><span class="n">gitbook</span><span class="o">:</span><span class="w"> </span><span class="n">default</span><span class="w">
  </span><span class="c1">#bookdown::pdf_book: default</span><span class="w">
</span><span class="o">---</span><span class="w">
</span></code></pre></div></div>

<p>The <code class="language-plaintext highlighter-rouge">site: bookdown::bookdown_site</code> pair calls <code class="language-plaintext highlighter-rouge">bookdown::render_book()</code>, and the output is specified as <code class="language-plaintext highlighter-rouge">bookdown::gitbook</code>. The outputs can also be specified in a separate <code class="language-plaintext highlighter-rouge">_output.yml</code> document as shown <a href="https://bookdown.org/yihui/bookdown/output-formats.html" target="_blank">here</a>, which is maybe better from an organizational standpoint. So now if I just run:</p>

<div class="language-r highlighter-rouge"><div class="highlight"><pre class="highlight"><code><span class="n">bookdown</span><span class="o">::</span><span class="n">render_book</span><span class="p">()</span><span class="w">
</span></code></pre></div></div>

<p>then everything works. Also because I have the <code class="language-plaintext highlighter-rouge">_bookdown.yml</code> in my root directory, which <code class="language-plaintext highlighter-rouge">render_book()</code> looks for by default, my chapter order and other variables are set correctly.</p>

<h3 id="markdown">Markdown</h3>

<p>But what if I don’t care about <code class="language-plaintext highlighter-rouge">.Rmd</code> files, because I don’t plan to have integrated R code? Well, I can just use <code class="language-plaintext highlighter-rouge">.md</code> markdown files! If I changed all the filenames and replace the <code class="language-plaintext highlighter-rouge">_bookdown.yml</code> file list with:</p>

<div class="language-yaml highlighter-rouge"><div class="highlight"><pre class="highlight"><code><span class="c1"># _bookdown.yml</span>

<span class="na">rmd_files</span><span class="pi">:</span> <span class="pi">[</span><span class="s2">"</span><span class="s">02.md"</span><span class="pi">,</span> <span class="s2">"</span><span class="s">01.md"</span><span class="pi">,</span> <span class="s2">"</span><span class="s">index.md"</span><span class="pi">]</span>
</code></pre></div></div>

<p>And when I <code class="language-plaintext highlighter-rouge">bookdown::render_book()</code> and visit <code class="language-plaintext highlighter-rouge">http://127.0.0.1:3000/_book/</code>, then everything looks good!</p>

<p>For the <code class="language-plaintext highlighter-rouge">#</code> heading in each file, if I add <code class="language-plaintext highlighter-rouge">{-}</code>, then it will skip section numbering.</p>

<h1 id="publishing-on-github">Publishing on GitHub</h1>

<p>I want to create github repo for the project, and I would also like to view the rendered site as updates are made. There are instructions <a href="https://bookdown.org/yihui/bookdown/github.html" target="_blank">here</a>.</p>

<h1 id="other-useful-stuff">Other useful stuff</h1>

<ul>
  <li>you can add bibliographies and citations: <a href="https://bookdown.org/yihui/bookdown/citations.html">https://bookdown.org/yihui/bookdown/citations.html</a></li>
  <li>you can add HTML widgets: <a href="https://bookdown.org/yihui/bookdown/html-widgets.html">https://bookdown.org/yihui/bookdown/html-widgets.html</a></li>
  <li>the <code class="language-plaintext highlighter-rouge">_bookdown.yml</code> file is highly customizable: <a href="https://bookdown.org/yihui/bookdown/configuration.html#configuration">https://bookdown.org/yihui/bookdown/configuration.html#configuration</a></li>
</ul>]]></content><author><name>Ben Purinton</name></author><category term="bookdown" /><category term="markdown" /><category term="r" /><category term="html" /><summary type="html"><![CDATA[I am working on an outline for a textbook for a fullstack programming course. I want to break my outline into lessons and generate a nice HTML view from the markdown files that will become the basis for an interactive textbook. Bookdown is the tool, documentation can be found here. Here is how I set it up and got started. Installing R with VS Code Bookdown using the R programming langauge and markdown documents. So the first step is getting R running with the necessary packages. And I want it integrated in VSCode. Install R: https://cloud.r-project.org/ (make sure to check “Save version number in registry”) Install VSCode R editor support: https://marketplace.visualstudio.com/items?itemName=REditorSupport.r In R install languageserver: https://github.com/REditorSupport/languageserver open RGui on Windows run install.packages("languageserver") also install rmarkdown with: install.packages("rmarkdown") Make sure R is on the system PATH, for me that was C:\Program Files\R\R-4.2.2\bin Close and re-open VS Code if you cannot access R interactive shell from the command-line. There should also be a new terminal option “R Terminal” that opens an interactive shell. can double check the packages installed with install.packages("languageserver") at the R Terminal, this shouldn’t do anything. Once that was setup, I made a test R script test.R: # My first program in R Programming myString &lt;- "Hello, World!" print (myString) And ran R test.R at the terminal. It worked. So R is up and running! First Steps with Bookdown To install bookdown for R, I just need to run (at the R terminal): install.packages("bookdown") Minimal Example Bookdown is built on rmarkdown. A demo for staring a project can be found here. However, I used the documentation minimal example here. render_book() I downloaded index.Rmd, then in the R terminal I ran: bookdown::render_book('index.Rmd', 'all') This generated a folder _book/ with a static HTML version of the content. This is the built book, and all arguments can be found in the documentation: bookdown::render_book(input = ".", output_format = NULL, ..., clean = TRUE, envir = parent.frame(), clean_envir = !interactive(), output_dir = NULL, new_session = NA, preview = FALSE, config_file = "_bookdown.yml") By leaving output_format empty, the book is rendered as the first output format specified in the YAML metadata of the first .Rmd file or a separate YAML file _output.yml (see here). When you set preview = TRUE, only the Rmd files specified in the input argument are rendered, which can be convenient when previewing a certain chapter, since you do not recompile the whole book, but when publishing a book, this argument should certainly be set to FALSE. clean_book() You can delete the built book with: bookdown::clean_book(TRUE) But be careful that things are version controlled with git so you don’t lose anything. Viewing the Book To view the static site in the _book/ directory. I installed the VSCode extension Live Preview. All I need to do is select one of the .html files, click the preview button in the code editor, and there it is. I can also just navigate to http://127.0.0.1:3000/_book/ in my browser. It even updates as I add chapters and redo the render_book() command. If the book is getting long and the pandoc conversion step of render_book() is taking awhile, then an individual chapter can be re-rendered using: bookdown::preview_chapter("index.md") Practical Example Chapter Order My default, bookdown will render files in the order of their name (e.g., 01-something.Rmd, 02-something-else.Rmd, etc.). I don’t want to provide an order in filenames, because I may want to remix and rematch. So I just need to override this behavior by making a _bookdown.yml file in the book directory and providing a file list: rmd_files: ["02.Rmd", "01.Rmd", "index.Rmd"] Filenames that start with an _ underscore are skipped. The file index.Rmd will always be treated as the first even if re-ordered in the list. I can create an appendix with # (APPENDIX) Appendix {-} at the top of a file, the {-} characters tell markdown not to give this a section number Front Matter For now, I want the book to render as a gitbook, which provides nice links and a navigation pane. So the front-matter of the index file should look like so: # index.Rmd --- title: "A Book" author: "Ben" site: bookdown::bookdown_site documentclass: book output: bookdown::gitbook: default #bookdown::pdf_book: default --- The site: bookdown::bookdown_site pair calls bookdown::render_book(), and the output is specified as bookdown::gitbook. The outputs can also be specified in a separate _output.yml document as shown here, which is maybe better from an organizational standpoint. So now if I just run: bookdown::render_book() then everything works. Also because I have the _bookdown.yml in my root directory, which render_book() looks for by default, my chapter order and other variables are set correctly. Markdown But what if I don’t care about .Rmd files, because I don’t plan to have integrated R code? Well, I can just use .md markdown files! If I changed all the filenames and replace the _bookdown.yml file list with: # _bookdown.yml rmd_files: ["02.md", "01.md", "index.md"] And when I bookdown::render_book() and visit http://127.0.0.1:3000/_book/, then everything looks good! For the # heading in each file, if I add {-}, then it will skip section numbering. Publishing on GitHub I want to create github repo for the project, and I would also like to view the rendered site as updates are made. There are instructions here. Other useful stuff you can add bibliographies and citations: https://bookdown.org/yihui/bookdown/citations.html you can add HTML widgets: https://bookdown.org/yihui/bookdown/html-widgets.html the _bookdown.yml file is highly customizable: https://bookdown.org/yihui/bookdown/configuration.html#configuration]]></summary></entry><entry><title type="html">Adding a `sitemap.xml` for SEO</title><link href="https://bendirt.com/sitemap-and-SEO/" rel="alternate" type="text/html" title="Adding a `sitemap.xml` for SEO" /><published>2023-01-04T00:00:00+00:00</published><updated>2023-01-04T00:00:00+00:00</updated><id>https://bendirt.com/sitemap-and-SEO</id><content type="html" xml:base="https://bendirt.com/sitemap-and-SEO/"><![CDATA[<p>SEO stands for Search Engine Optimization. I want to improve how my site comes up when people search for it. As usual, I’m relying heavily on <a href="https://www.cross-validated.com/Personal-website-with-Minimal-Mistakes-Jekyll-Theme-HOWTO-Part-IV/" target="_blank">this wonderful guide</a>.</p>

<h2 id="register-on-google-search-console">Register on Google Search Console</h2>

<p>The first thing I did was register my domain on the <a href="https://search.google.com/search-console/about" target="_blank">Google Search Console</a>. That was easy, because I had already purchased the domain from <a href="https://domains.google/" target="_blank">Google Domains</a>. The search console allows us to track our site and improve the search results.</p>

<h2 id="generate-a-sitemap">Generate a sitemap</h2>

<p>For the search console, we need a <code class="language-plaintext highlighter-rouge">sitemap.xml</code> that is just a map of all the URLs in our domain. I noticed the <code class="language-plaintext highlighter-rouge">site.xml</code> was in the <code class="language-plaintext highlighter-rouge">_site/</code> folder of my local build, and was updated everytime I ran:</p>

<div class="language-plaintext highlighter-rouge"><div class="highlight"><pre class="highlight"><code>bundle exec jekyll build
</code></pre></div></div>

<p>That’s the handy command-line way to locally rebuild the website in the <code class="language-plaintext highlighter-rouge">_site/</code> folder when I make changes. <strong>However,</strong> if I run:</p>

<div class="language-plaintext highlighter-rouge"><div class="highlight"><pre class="highlight"><code>bundle exec jekyll serve
</code></pre></div></div>

<p>(which first executes a <code class="language-plaintext highlighter-rouge">build</code>), then the <code class="language-plaintext highlighter-rouge">sitemap.xml</code> appears like:</p>

<div class="language-html highlighter-rouge"><div class="highlight"><pre class="highlight"><code><span class="cp">&lt;?xml version="1.0" encoding="UTF-8"?&gt;</span>
<span class="nt">&lt;urlset</span> <span class="na">xmlns:xsi=</span><span class="s">"http://www.w3.org/2001/XMLSchema-instance"</span> <span class="na">xsi:schemaLocation=</span><span class="s">"http://www.sitemaps.org/schemas/sitemap/0.9 http://www.sitemaps.org/schemas/sitemap/0.9/sitemap.xsd"</span> <span class="na">xmlns=</span><span class="s">"http://www.sitemaps.org/schemas/sitemap/0.9"</span><span class="nt">&gt;</span>
<span class="nt">&lt;url&gt;</span>
<span class="nt">&lt;loc&gt;</span>http://localhost:4000/backtick-code-color/<span class="nt">&lt;/loc&gt;</span>
<span class="nt">&lt;lastmod&gt;</span>2023-01-03T00:00:00-09:00<span class="nt">&lt;/lastmod&gt;</span>
<span class="nt">&lt;/url&gt;</span>
<span class="nt">&lt;url&gt;</span>
<span class="nt">&lt;loc&gt;</span>http://localhost:4000/deploying-own-domain/<span class="nt">&lt;/loc&gt;</span>
<span class="nt">&lt;lastmod&gt;</span>2023-01-03T00:00:00-09:00<span class="nt">&lt;/lastmod&gt;</span>
<span class="nt">&lt;/url&gt;</span>
<span class="nt">&lt;url&gt;</span>
<span class="nt">&lt;loc&gt;</span>http://localhost:4000/fresh-jekyll/<span class="nt">&lt;/loc&gt;</span>
<span class="nt">&lt;lastmod&gt;</span>2023-01-03T00:00:00-09:00<span class="nt">&lt;/lastmod&gt;</span>
...
</code></pre></div></div>

<p>All of the domain is at the base URL of <code class="language-plaintext highlighter-rouge">http://localhost:4000/</code>. That’s because <em>Jekyll 3.3 overrides config site.url with url: <code class="language-plaintext highlighter-rouge">http://localhost:4000</code> when running jekyll serve locally in development. If you want to avoid this behavior set <code class="language-plaintext highlighter-rouge">JEKYLL_ENV=production</code> to force the environment to production.</em></p>

<p>Oops! I didn’t want to mess with the <code class="language-plaintext highlighter-rouge">JEKYLL_ENV</code> variable, and I wanted to continue making local edits, so rather than this, I just ran a plain:</p>

<div class="language-plaintext highlighter-rouge"><div class="highlight"><pre class="highlight"><code>bundle exec jekyll build
</code></pre></div></div>

<p>And that gave me a nice <code class="language-plaintext highlighter-rouge">_site/sitemap.xml</code> file:</p>

<div class="language-html highlighter-rouge"><div class="highlight"><pre class="highlight"><code><span class="cp">&lt;?xml version="1.0" encoding="UTF-8"?&gt;</span>
<span class="nt">&lt;urlset</span> <span class="na">xmlns:xsi=</span><span class="s">"http://www.w3.org/2001/XMLSchema-instance"</span> <span class="na">xsi:schemaLocation=</span><span class="s">"http://www.sitemaps.org/schemas/sitemap/0.9 http://www.sitemaps.org/schemas/sitemap/0.9/sitemap.xsd"</span> <span class="na">xmlns=</span><span class="s">"http://www.sitemaps.org/schemas/sitemap/0.9"</span><span class="nt">&gt;</span>
<span class="nt">&lt;url&gt;</span>
<span class="nt">&lt;loc&gt;</span>https://bendirt.com/backtick-code-color/<span class="nt">&lt;/loc&gt;</span>
<span class="nt">&lt;lastmod&gt;</span>2023-01-03T00:00:00-09:00<span class="nt">&lt;/lastmod&gt;</span>
<span class="nt">&lt;/url&gt;</span>
<span class="nt">&lt;url&gt;</span>
<span class="nt">&lt;loc&gt;</span>https://bendirt.com/deploying-own-domain/<span class="nt">&lt;/loc&gt;</span>
<span class="nt">&lt;lastmod&gt;</span>2023-01-03T00:00:00-09:00<span class="nt">&lt;/lastmod&gt;</span>
<span class="nt">&lt;/url&gt;</span>
<span class="nt">&lt;url&gt;</span>
<span class="nt">&lt;loc&gt;</span>https://bendirt.com/fresh-jekyll/<span class="nt">&lt;/loc&gt;</span>
<span class="nt">&lt;lastmod&gt;</span>2023-01-03T00:00:00-09:00<span class="nt">&lt;/lastmod&gt;</span>
...
</code></pre></div></div>

<h2 id="submit-the-sitemap">Submit the sitemap</h2>

<p>Now <em>this</em> is what I need to upload to the Google Search Console “Sitemap” at: <code class="language-plaintext highlighter-rouge">https://search.google.com/search-console/sitemaps</code>.</p>

<p>But I can’t just upload this, I need to submit a URL….</p>

<p><strong>All that dancing around for nothing. If I visit my deployed website, then an updated <code class="language-plaintext highlighter-rouge">sitemap.xml</code> already exists at <code class="language-plaintext highlighter-rouge">https://www.bendirt.com/sitemap.xml</code>. I guess this was generated during the github-pages deployment?</strong></p>

<p>Now it’s just about patience with the Google Search Console, since it may take a few days to update with analytics.</p>]]></content><author><name>Ben Purinton</name></author><category term="github-pages" /><category term="seo" /><category term="jekyll" /><summary type="html"><![CDATA[SEO stands for Search Engine Optimization. I want to improve how my site comes up when people search for it. As usual, I’m relying heavily on this wonderful guide. Register on Google Search Console The first thing I did was register my domain on the Google Search Console. That was easy, because I had already purchased the domain from Google Domains. The search console allows us to track our site and improve the search results. Generate a sitemap For the search console, we need a sitemap.xml that is just a map of all the URLs in our domain. I noticed the site.xml was in the _site/ folder of my local build, and was updated everytime I ran: bundle exec jekyll build That’s the handy command-line way to locally rebuild the website in the _site/ folder when I make changes. However, if I run: bundle exec jekyll serve (which first executes a build), then the sitemap.xml appears like: &lt;?xml version="1.0" encoding="UTF-8"?&gt; &lt;urlset xmlns:xsi="http://www.w3.org/2001/XMLSchema-instance" xsi:schemaLocation="http://www.sitemaps.org/schemas/sitemap/0.9 http://www.sitemaps.org/schemas/sitemap/0.9/sitemap.xsd" xmlns="http://www.sitemaps.org/schemas/sitemap/0.9"&gt; &lt;url&gt; &lt;loc&gt;http://localhost:4000/backtick-code-color/&lt;/loc&gt; &lt;lastmod&gt;2023-01-03T00:00:00-09:00&lt;/lastmod&gt; &lt;/url&gt; &lt;url&gt; &lt;loc&gt;http://localhost:4000/deploying-own-domain/&lt;/loc&gt; &lt;lastmod&gt;2023-01-03T00:00:00-09:00&lt;/lastmod&gt; &lt;/url&gt; &lt;url&gt; &lt;loc&gt;http://localhost:4000/fresh-jekyll/&lt;/loc&gt; &lt;lastmod&gt;2023-01-03T00:00:00-09:00&lt;/lastmod&gt; ... All of the domain is at the base URL of http://localhost:4000/. That’s because Jekyll 3.3 overrides config site.url with url: http://localhost:4000 when running jekyll serve locally in development. If you want to avoid this behavior set JEKYLL_ENV=production to force the environment to production. Oops! I didn’t want to mess with the JEKYLL_ENV variable, and I wanted to continue making local edits, so rather than this, I just ran a plain: bundle exec jekyll build And that gave me a nice _site/sitemap.xml file: &lt;?xml version="1.0" encoding="UTF-8"?&gt; &lt;urlset xmlns:xsi="http://www.w3.org/2001/XMLSchema-instance" xsi:schemaLocation="http://www.sitemaps.org/schemas/sitemap/0.9 http://www.sitemaps.org/schemas/sitemap/0.9/sitemap.xsd" xmlns="http://www.sitemaps.org/schemas/sitemap/0.9"&gt; &lt;url&gt; &lt;loc&gt;https://bendirt.com/backtick-code-color/&lt;/loc&gt; &lt;lastmod&gt;2023-01-03T00:00:00-09:00&lt;/lastmod&gt; &lt;/url&gt; &lt;url&gt; &lt;loc&gt;https://bendirt.com/deploying-own-domain/&lt;/loc&gt; &lt;lastmod&gt;2023-01-03T00:00:00-09:00&lt;/lastmod&gt; &lt;/url&gt; &lt;url&gt; &lt;loc&gt;https://bendirt.com/fresh-jekyll/&lt;/loc&gt; &lt;lastmod&gt;2023-01-03T00:00:00-09:00&lt;/lastmod&gt; ... Submit the sitemap Now this is what I need to upload to the Google Search Console “Sitemap” at: https://search.google.com/search-console/sitemaps. But I can’t just upload this, I need to submit a URL…. All that dancing around for nothing. If I visit my deployed website, then an updated sitemap.xml already exists at https://www.bendirt.com/sitemap.xml. I guess this was generated during the github-pages deployment? Now it’s just about patience with the Google Search Console, since it may take a few days to update with analytics.]]></summary></entry></feed>